Monday, November 16, 2015

Finished Project: Cheap Wall Art

When we moved into our house nearly 4 years ago, we brought with us a fairly decent amount of furniture and decorative pieces from our old place. Some of the stuff in our house is going on 8 years old. Come to think of it, I can think of a few things that Joe or I brought into our relationship that we had long before we even met!

Needless to say, I'm bored of some of our house decor, especially the master bedroom. I've already transformed it from a style that never came to fruition to something a lot more put together and chic. It's mostly done but it still could use a couple more finishing touches. Good thing I'm cheap and crafty. I also like the idea of having wall art or knick knacks that not every one has.

A couple months ago I found 4 blank canvases at the thrift store. The 4 of them cost me a total of $0.40. I had every intention of painting them in some beautiful way or allowing Quinn to paint them in some abstract way. Until Joe came back from the grocery store with a newspaper that I hated to throw in the recycling bin. Could I turn this "trash" into something I'd like to hang on my wall?

This is what I started with:

I wish I'd had a bigger canvas but cheapskates can't be choosers!

I don't know why I didn't take a picture of it, but I spray painted the canvas with the black spray paint and let it dry all afternoon. Then I cut out shapes from some of the more colorful sections of the newspaper.

I ended up with mostly take out menus and car ads.


I let Quinn put the diamond-like shapes on the canvas to see if she could come up with a decent design. I actually liked it!

The only problem is that some of the paper was hanging off the edge.
Maybe I'd just let her put glue on the pieces and I would stick them down on the canvas. She was happy enough getting to play with the glue that she didn't even whine about the demotion.

I pushed all the loose pieces off the canvas and started anew.

Well, here goes nothing!

This project took less than 30 minutes (minus the waiting for the spray paint to dry!). I love when I can finish a project so soon after starting. I also love when I can include the kids a little bit. This would be a great project for a kid Quinn's age and older. She's 4 and 1/2, by the way

All done! It won't end up on the mantle but it was a good enough place to photograph it for you.

This would also be a great holiday project if you used wrapping paper instead of newspaper. It would be a great way to commemorate your kids first christmas, or birthday, or even your baby shower! Now I wish I'd thought of this sooner!

I really love how this turned out. Would it be too weird to do this will my other 3 canvases?!
Another great idea would be to use a frame instead of the canvas. That would save on having to worry about painting it. Plus a frame might be a little more decorative. Also you could have the pattern make up your kids initials or something! I'm practically crying at my missed opportunity! Lol. Someone I know better do this so I can get really depressed! And when you do, make sure I know about it so I can live vicariously through you!


Friday, November 13, 2015

Kids Fall & Halloween Photo Shoot!

This is such a great time of year where I live. I will forever prefer summer to winter, but I'm glad for the colorful segue of fall to ease the sadness of cold weather approaching. Those beautiful oranges, yellows, and reds mixed among the trees made for a great back drop to my Halloween themed photos. And once those magnificent leaves fell, before Joe goes through the hassle of having to clear them away from the yard, they made another great back drop for some fall themed photos. 

Last year, I took tons of pictures for each theme so they each got their own blog post. This year, I was super rushed and completely strapped for time to take pictures, so I went very light on pictures. It kind of bums me out but at least I got a couple of good shots. In the end, that's all that really matters!

Halloween Photo Shoot!!


As usual, I tried to get some pictures of the kids by themselves. I have this idea that at some point in the future (a long, long time from now!!) that I'll make collages or scrapbooks or something for each of the kids in their Halloween costumes every year. I think they might each like to have their own. There's probably only like a 3% chance that this idea of mine will ever come to fruition.  But just in case I do decide to make it happen, I'll have the pictures. So, here's the ONLY shot of Mitchell that he stood still for.

My little skeleton!
After a couple clicks of the camera, he started kicking the pumpkin. So, I sent in reinforcements:

The best shot of the day!!!


Quinn being a little ham!!

I wish they hadn't been completely in front of the pumpkin, but it's still cute!

The only direction I gave Quinn was, "Smile and don't let Mitchell get away!" Hence why she was holding onto her little brother for dear life in every picture! Lol. It worked for these few pictures, but it didn't last long:

She let go for a second and he went straight for the pumpkin!

Even the pumpkin didn't keep his attention for very long.. 

He ran straight for me and nearly knocked me over! He wanted a hug!

I knew he wouldn't last long at all at this point and Quinn didn't get an "alone" shot yet. I had to hurry up!

 
She's such a little actor!
It is so hard to take pictures of both kids when Joe is not around to corral them. I was only able to snap 4 pictures of Quinn before I lost sight of Mitchell and had to drag the kids back inside. All in all, though, I can't really complain. I accomplished what I needed to do. The whole photo shoot took about 10 minutes making this the shortest photo shoot of ours ever!


Fall Photo Shoot!


We finally had a weekend day where we had absolutely nothing going. That hardly ever happens. We almost always have something going on and we love it. But we also love lazy days, too. After lunch, Joe and the kids went outside while I puttered around the house. I could hear the kids having a grand old time outside and I just could not concentrate on anything. The source of the kids giddiness: Joe raked a ton of leaves to the bottom of the slide so the kids could slide down into them. It looked and sounded like a blast, so I grabbed my camera and coat and went outside.


Mitchell was in little kid heaven! He was climbing up the ladder and sliding down, sometimes face first, into the leaves quicker than I've ever seen him go before. And every time he came down, he'd make these ridiculously cute faces at me. His joy was catching! 


Quinn was a big bucket of smiles, too. 


Even Joe took a break from whatever he was doing and snapped a picture of me and the kids horsing around in the leaves. We all had a great time. As much as I love being out and about on the weekend, I also really enjoy these lazy family days, too. 

Actually, the next time we have one of these "family days" it won't end up being very lazy. It will be the day we spend setting up the house, both indoors and out, for the Christmas season! I am so looking forward to it! Stay tuned!


Monday, November 9, 2015

Jill Can Cook: Easy Cheesy Sausage Rice Bake

During my weekly grocery shopping excursion, I came across some sausage that was on sale, but needed to get used up right away. Being so frugal, I grabbed it.

When I decided to make it for dinner, I didn't want to make my usual spaghetti or sausage/pepper/onion sandwiches. We'd been having a lot of pasta recently and I think we were all getting bored with the same old, same old.  Here does nothing!

Easy Cheesy Sausage Rice Bake

Adapted from: Just a Pinch

Ingredients


  • 2 c cooked rice, 
  • 1 lb sausage 
  • 1tbsp onion powder 
  • 1 clove garlic minced
  • 1 tsp salt
  • 1 tsp black pepper
  • 1 tsp red pepper flakes (I used chili powder)
  • 2 c ( 8 ounces ) shedded cheese
  • 1 - 14.75 oz cream of chicken soup
  • 1 - 10 3/4 oz cream of mushroom soup
Directions:

  1. Preheat oven to 375 degrees F.
  2. Grease a 9 x 13 baking dish, set aside.
  3. Brown sausage , onion, garlic, seasonings together in about 1 tablespoon oil, and drain.
  4. Combine the rice with the sausage mixture. 
  5. Add soups and shredded cheese; stir to mix thoroughly.
  6. Pour mixture into greased casserole dish.
  7. Bake 25-30 minutes or until casserole bubbles in the center.
  8. Remove from oven and sprinkle additional cheese on top, if desired. Bake for an additional 5 to 10 minutes. Roughly 40 minutes in all.

For an easy casserole type recipe, I took a lot of pictures.

I cu the sausage out of the casing and browned it.

I precooked the rice. 

Added in the soups, seasonings and cheese.

Before it went into the oven. Looks pretty good already!

After it was done!! 

I make a lot of casseroles and a lot of dishes that are very similar. It's mostly because I search out recipes that are made up of ingredients I usually keep stocked in my pantry. That way, I can put together something different without needing to make a trip to the store.

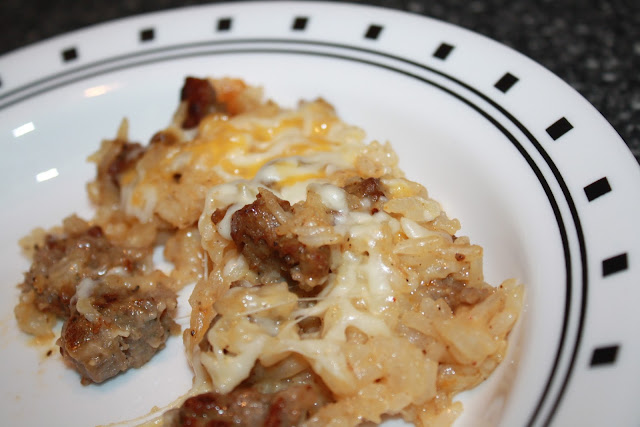
Look at that cheesy goodness!

I love that I now have another easy to put together dinner recipe for my family. This recipe made a few more dirty pans than I would've preferred, but nothing I can't handle.

This was my portion for dinner... Well, my first portion anyway!!

The flavor was great! It was very sausagey and very cheesy. Even the amount of spice was spot on. Joe and I both loved it, although the kids were semi-picky about it.

 See that cheesy goodness.

The only issue that I had with this recipe (and most casserole recipes) is that we ended up with like a million leftovers. Some day, when the kids eat normal sized portions, we won't have as many leftovers and this won't be an issue.

Look at all that sausage!!

Overall, this recipe gets an A from the adults in our family. And I can't wait to make it again!