Monday, February 29, 2016

DIY: Oversized Shirt Into Fitted Peplum Top

I posted my last refashion about 5 months ago. Why has it taken me so long to post another, you ask. Mainly because I stopped looking for stuff to refashion. The new thrift store I frequent offers lots and lots of clothing items that are already perfect. But I was dying to make something mine again!

So, the past couple of weeks, I've been trying to look for a shirt of some sort that was a couple sizes too big so that I could work some magic on it. That's when I came across this little number:

Mitchell wanted to be in the picture with me. And I have a crazy hair!

It's this really colorful paisley-esque pattern. I hit the jackpot when I snatched this shirt up for $0.30!

Judging from the tag, it was from Kohl's. The pattern was kind of old ladyish, but that was what I loved about it. It was going to be an eye catcher: A modern shirt with an unexpected pattern!

I look like a fabulous Christmas tree!
On to the re-imagining!!

WAIT!!! I want to brag for a second. You know how I was always telling you that I needed to stop forgetting to purchase pinking shears?!

I finally effin' bought a pair! Woo hoo!

Ok, brag over. Back to this shirt!

The boring inside of the shirt.

So, I flipped the shirt inside out. I planned on turning it into a peplum, 3/4 length sleeve top. So I got to cutting:

5 inches off the arms and 9 inches or so off the bottom.

Then I tried it on to figure how much I'd need to take it in in order to make it fit nicely.

I measured and pinned about 4 & 1/2 inches on the sides and about 3 inches in the arms.

Then I sewed the arms and bodice where I pinned.

I also got a new kitchen set since the last time I had my sewing machine out! Worked great with the new set up!

I also needed to sew up a new cuff (or hem or whatever) on the arms. I just eyeballed it and did not pin or measure. I'm a rebel!

I lucked out in that my laziness still yielded perfect results.
OK, this is the dreaded part where I'd need to reattach the bottom to the top.

I've done this before on a dress, but it was so long ago (and only once) that there was some trial and error during the pinning process this time, but I made it happen.

Ohh joyous moment! I can feel how good this is turning out already!

My last bit of sewing and a slightly better shot of my table!

And that's it! I got this project done in hardly any time at all! I think one thing that majorly helped was that I couldn't find my tripod in order to take my before and after shots. It takes a lot of time to wait the 10 seconds between hitting the shutter and the camera taking the pictures because I always want to take 15 or so pictures to ensure I have one that doesn't suck.

Without the tripod, I used the next best thing: Quinn. And she just captured picture after picture in such quick succession! Thanks, kiddo!  It was fun to work together, little helper!
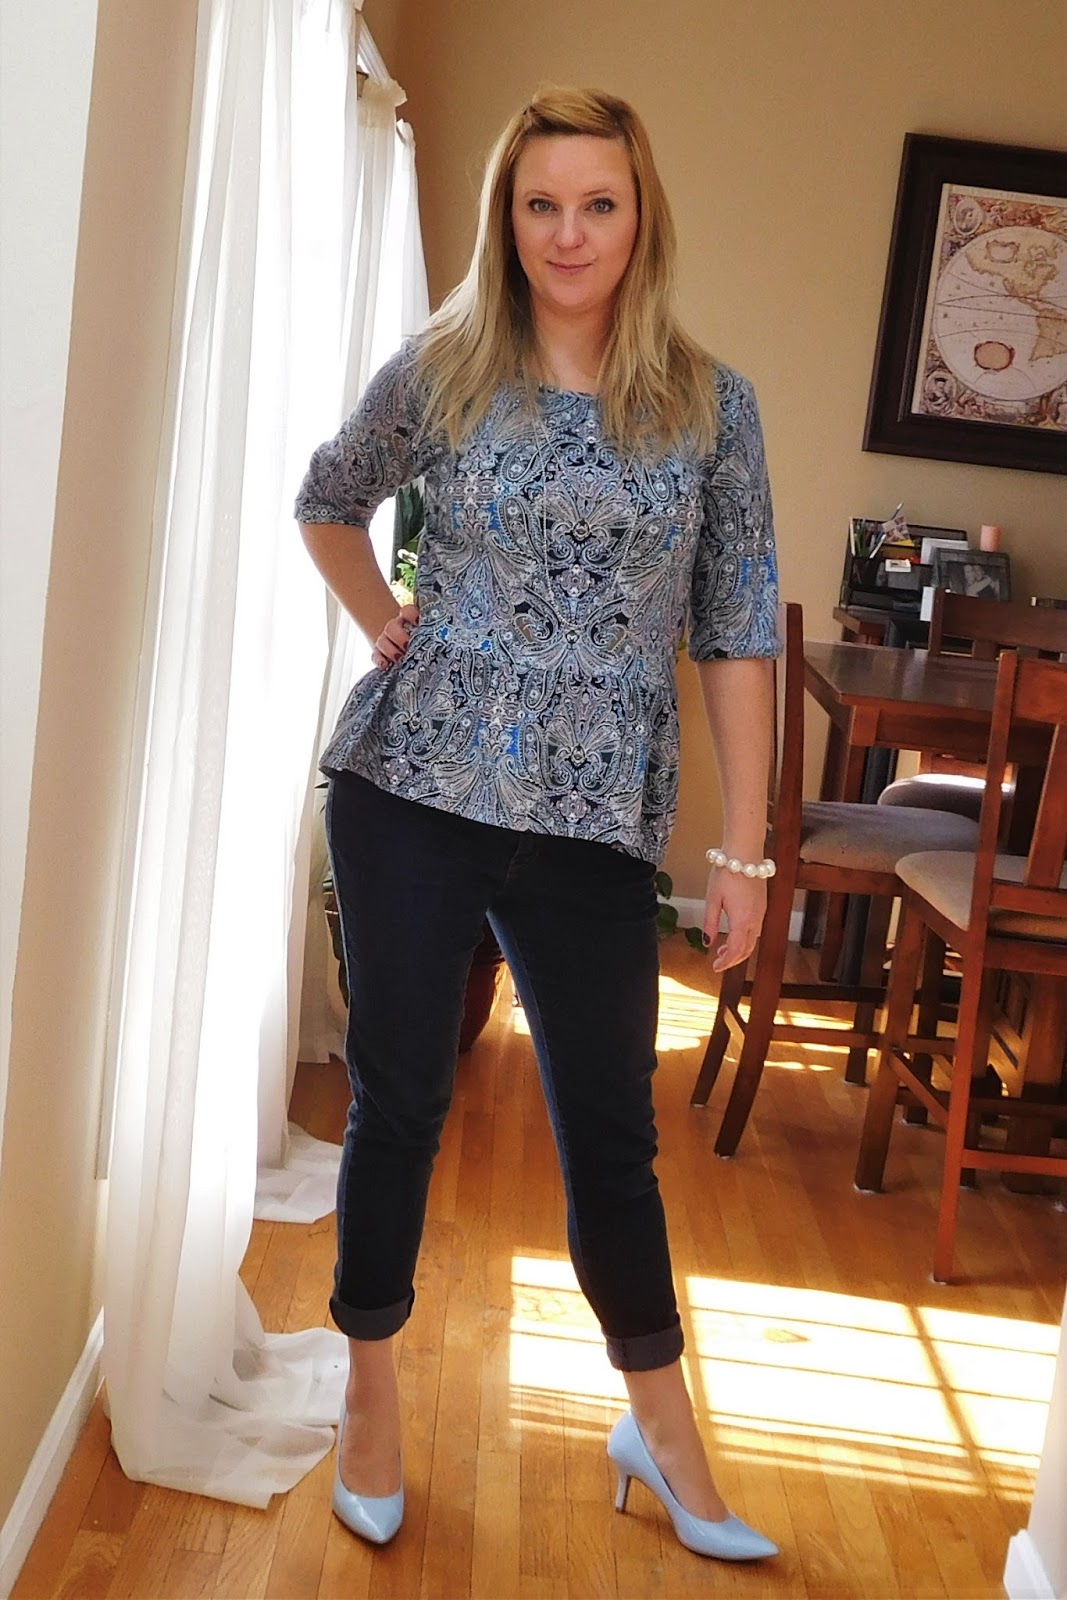
And here it is:

My eye ball looks weird. Don't look at it!

I am really happy with how the shirt turned out!! I even had these perfectly matched light blue heels to wear with it!

My blog wouldn't be complete without a picture of me with a double chin!
I think this is my first refashion that I've gone into knowing exactly what I wanted to turn my garment into . It's also the first refashion that I can wear with the current state of the weather!

This angle makes me look really thin! Score!

I'm ultra, mega pleased with how this turned out. I'm on the fence on if I should've made the bodice and sleeves a bit tighter or not. I'm kind of thinking it's better a little looser. It feels more comfortable that way.

I hope I can keep the momentum going and do a couple more refashions in the upcoming months for you guys!  Hope you enjoyed it ask much as I did!


Friday, February 19, 2016

Jill Can Cook: Oven Roasted Kielbasa & Potatoes

It's no secret that I love kielbasa. I always thought I hated it when I was a kid. I never looked forward to it when my mom would make it for dinner. I rarely ate it.

And then one day my grandfather sliced some kielbasa up, marinated it in barbeque sauce and threw it on the grill. I don't even know why I grabbed one since I hated them so badly. But I did try it and I realized: I didn't hate kielbasa! I just hated how my mom cooked it (she boiled it. I think she still does to this day). From that day forward, I was in love. But only not boiled kielbasa.

My only problem now is that Joe, my husband, is not much of a fan. Boiled, grilled, whatever method of cooking, he'll eat it, but he's not very thrilled. I've gotta get this guy on board somehow. I found this recipe and I'm hoping it'll be the turning point for Joe!!

Oven Roasted Kielbasa & Potatoes


Adapted from: Recipes From The Big Blue Binder

Ingredients:


  • 1 package of smoked sausage (Peel if necessary, and slice into rounds)
  • 1 large onion, peeled and chopped
  • 5 large potatoes, peeled and chopped into 1/2 inch cubes
  • olive oil
  • fine sea salt
  • freshly ground black pepper
  • sweet paprika
  • dried thyme
  • a handful of grated strong cheddar cheese

Directions:

  1. Preheat the oven to 400*F.
  2. Line a large baking tray (with sides) with several sheets of foil, and drizzle with a bit of oil. Spread the oil out over the pan. Set aside.
  3. Put the sausage rounds, onions and potatoes into a large bowl.
  4. Drizzle with a couple TBS of olive oil and season to taste with salt, pepper, paprika and dried thyme.
  5. Toss together with your hands until everything is evenly distributed.
  6. Pour this out onto the baking tray, and spread it out as much as you can.
  7. Place into the heated oven and roast for 45 minutes to an hour, stirring every 15 minutes or so, until the potatoes are golden brown and tender.
  8. Turn off the oven. Scatter the cheese over top of the cooked meat and potatoes,
  9. Pop back into the oven a few minutes to melt the cheese. Serve immediately.
If you read the ingredients and saw the picture of my ingredients, you will notice a bit of a difference. That is because I used half as many potatoes (and half an onion since I'm not a huge onion lover). I knew my kids would eat the kielbasa, but I didn't think they'd eat the potatoes. They're weird about potatoes that aren't french fries. Anyway, I didn't want to have tons of potatoes leftover.

My foiled pan. I just tossed everything together in the pan instead of dirtying an additional bowl.

I only used 3 medium sized potatoes and look at them all!! 

Look at all that melty, cheesy goodness!

This seemed like a pretty straight forward recipe. I wasn't reinventing these ingredients, I was just putting together stuff that I'd otherwise have cooked separately. I didn't have the highest hopes that this would be the best food ever made I only hoped it didn't suck.

My portion.. Doesn't look like much but it was very filling.
I am on the fence as far as this recipe goes. It was easy to put together. It tasted good, although it was kind of bland. I ate my portion gladly. Joe went back for seconds and finished the pan. But really, making the dish this way didn't save me time or come out any better than had I made it separately. I think I would've preferred it separately, as the kielbasa didn't have that sear that I love so much.

I'm also really glad that I didn't make 5 potatoes. Quinn barely ate the 5 little pieces of potato I gave her and Mitchell didn't eat any of it. (To come to his defense: He ended up getting really sick the next day, so maybe it wasn't that the dish wasn't enticing, but rather he was already somewhat sick).

So, I'll give it a B. There's nothing inherently wrong with the recipe, but if I'm going to cut up potatoes and kielbasa, I'd prefer them cooked differently. I guess there's really no right or wrong.  I told my mom about the recipe and she made it for my dad for dinner. They both loved it. 


Wednesday, February 17, 2016

Jill Can Cook: Chicken Salad Sandwich

Sometimes, I am just in the mood to try out a new recipe with no requirements other than the fact that I've never made the recipe before. That's how I chose this recipe. I woke up one morning knowing that I had to meal plan and grocery shop that morning. So, I went online and sifted through my millions of dinner dish pins on Pinterest. After a long time of searching, I got to the bottom of my folder, my oldest pins ever, and there this recipe was.

Joe likes chicken salad. I like chicken salad. We would both need to eat food for lunch and instead of buying deli meat/making leftovers or (God forbid!!) buying a $10 sandwich on the go (or a $5 slice of pizza!! Why is fast food so expensive!!?!?!?!). I saw this recipe and knew it could be whipped up in a jiffy.

Before I get going, I want to mention a few things:
  1. This recipe was originally supposed to be a copycat of Panera Bread's chicken salad
  2. I've never been to Panera Bread or have eaten their chicken salad.
  3. The recipe is a copycat of an older recipe and the recipe Panera uses has since changed.
  4. I am not following the recipe exactly. So, don't go to Panera Bread thinking you're going to have a chicken salad sandwich AT ALL like mine.
Anyway, I'm sorry this whole recipe is a huge lie. I just want some yummy chicken salad!

My "It's Nothing Like Panera Bread's" Chicken Salad Sandwich 

Adapted from:
Panera Bread At Home


Ingredients:


  • 1-1/2 lb boneless skinless chicken breast
  • 2 celery ribs, chopped
  • red onion, chopped
  • lettuce
  • mustard (I used honey dijon because I hate yellow mustard)
  • onion powder
  • garlic powder
  • pepper
  • salt
  • 1 teaspoon lemon juice
  • 1 cup mayonnaise 
  • 1 1/2-2 tablespoons granulated sugar
  • sliced white bread 

Directions:
  1. Butterfly chicken.
  2.  Season both sides of the chicken with garlic and onion powder. 
  3. Heat oil in a saucepan on medium heat.
  4. Add chicken to saucepan. Cook until chicken is cooked through.
  5. Set the chicken aside and let cool.
  6. Chop the celery, red onion, and the cooled chicken and set in a bowl.
  7. In another small bowl add mayo, sugar, pepper, salt lemon juice and whisk until well combined. You want the sugar to disintegrate so that you're not tasting the grain.
  8. Mix the mayo mixture with the chicken, celery, and onion mixture.
  9. Take a slice of bread (or wrap or pita pocket) and add any extra fixings you like (like lettuce, tomato, etc).
  10. Top with the chicken salad and another slice of bread.
  11. Enjoy!

I made this dish when Joe was home and for the life of me, I couldn't get him to help me with one step! I was feeling quite lazy and would've loved the help, but I powered through, all on my own, because I love you guys (all 3-4 of you brazilians and russians!). You guys deserve the best and I hope, for once, I can give you the best... Onto the pictures!!

I cooked that chicken like a boss!

I got a new knife recently. It made the celery and red onion chopping go by so fast!!

The mayonnaise sauce was so creamy and smelled enticing!

I mixed the chicken, celery, and onion together before I added in the sauce just to make sure everything was evenly distributed.

The finished product, minus the bread.
I started making this a little later than I planned. I'd wanted to have it for lunch that afternoon, and by the time it was mixed, it was past lunch time so I was starving and dying to eat.

Let me just stop right here to say: It was very enjoyable but... It was more enjoyable the next day, after it had been refrigerated (as opposed to room temperature that first time I ate it) and also after the flavors had a chance to marry. So, keep that in mind if you decide to make it.

Joe picked out the best lettuce! 
I didn't realize that this recipe would yield so much chicken salad! Joe and I each had a sandwich that day. I had two more sandwiches over the course of the next few days. Joe had one more sandwich and then ate the rest without any bread (no idea why, but he said it was really good like that, too!).

I even perfectly toasted that bread!
I didn't even try to give any of this to the kids. I gave them grilled cheese sandwiches or pb&j sandwiches on the days that I ate the chicken salad. I'm sure they appreciated it. They aren't very adventurous eaters. 

Mmmm... 
Joe makes a really great chicken salad as well, but I like this one better. Joe prefers anything he doesn't have to cook. I think we'd both give this recipe an A+, especially when it came to the flavor of the leftovers! I'm also glad I finally made something that I'm proud to share with you guys! So hurry up and make it and let me know what you think!


Monday, February 15, 2016

Valentine's Day Photo Shoot

Winter can be so boring. Especially for a stay-at-home mom... Who lives in the northeast... Who's experiencing the coldest weather we've had this winter. I hate to complain, but dang, it's cold out there! The temps have been below zero the past few days. It doesn't make me feel like taking my kids anywhere. I hate to even bring the trash out due to the freezing temps (thank God for husbands!).

Anyway, it's too cold to go out and really enjoy myself, so I turned my kids into my models so that we'd have something fun to do. And by "we" I mean "me." The kids weren't tortured or anything, but standing around, smiling while I click my camera in their faces is not their favorite thing to do. They humor me, at least.

I bought a clothing rack several months ago. If I remember correctly, it cost $35. I picked it up because I thought it would be ideal to hang sheets on it for a backdrop. You know, so I don't have to clean my house and rearrange furniture like I usually do for my amateur photo shoots. My mom let me borrow her red tablecloth, since I planned to send the pictures (if they were worthy) with Valentine's cards to some family members. This is what I came up with:

Mitchell was quite energetic at the start.

First I sat Quinn down on a little stool and had Mitchell stand.

Look at those silly smiles!!
I was wrong. Mitchell just wouldn't sit still or take any direction. And I was losing Quinn fast. The longer she smiles, the weirder the smile gets.

Quinn is turning into a pretzel!

Ok. Enough. They're smiling but this is just not gonna cut it. Mitchell would have to sit.

We're getting close!!
They're smiling. They're in a good position. But the longer it takes me to get Mitchell to actually look at the camera, the more Quinn's head sinks to the side...

See what I mean!!

It's like she's made of snow and is melting. Poor kid. I had to actually go over and put her head straight. She didn't know how to fix it otherwise.

And then..

Magic!

We finally got it! It only took 10 minutes and about 25 shots. Not bad. I think the kids are finally at the point that they know what I want out of them.

Even though I got the shot and knew this would be the one I'd send, I couldn't just stop there. I tried another pose just in case.

I love the hugging pose!

Meh. It's cute, but I've gotten cuter pictures of them hugging.

I was done, but I wanted to make sure the kids enjoyed themselves, so I let them make up their own poses. This is what they came up with:

Mitch has no idea what's going on.

That's the spirit! Get nice and silly!

And more weirdness ensues...

"Mom, are we done yet?"

Yes, we're done, guys. They did great. I can't wait until the next time we take pictures! It will most likely be for St Patrick's Day. But we'll be having a party between now and then, which means: More Appetizer Recipes!!! So stay tuned!!!

Thursday, February 4, 2016

Jill Can Cook: Healthy Zucchini Muffins

I've really wanted to add more vegetables into my life. I started this quest many months ago with zucchini and after cooking it a couple different way without ever enjoying it, I gave up on adding zucchini into my life.

That is, until Joe's grandmother served homemade zucchini bread at a get together not too long ago and it reinvigorated me. I liked it in the bread with all the spices, so that counts as adding zucchini to "the foods I will eat" list, doesn't it? I mean, it's going to take some more tries before it fully counts, but it's there in theory.

For my first attempt at delicious zucchini, I decided to turn it into muffins. Kids like muffins and I'd need them to eat at least half of these. They also REALLY wanted to help, so here goes!

Healthy Zucchini Muffins


Adapted from: Gimme Some Oven

Ingredients:

I photographed a lot of zucchini, but I only used 2 of them.

  • 1 2/3 cups white whole wheat flour (or all-purpose flour)
  • 1 teaspoon baking powder
  • 1 teaspoon baking soda
  • 1 teaspoon ground cinnamon
  • 1/2 teaspoon salt
  • 1 egg
  • 1/2 cup maple syrup
  • 1/2 cup milk (almond milk, 2% milk, or whatever you prefer)
  • 1/4 cup melted coconut oil
  • 1 teaspoon vanilla extract
  • 1 1/2 cups grated fresh zucchini
  • 1/3 cups old-fashioned oats (uncooked), plus extra for sprinkling

Directions:

  1. Heat oven to 350°F.  Prepare a 12-cup muffin pan by either greasing it with cooking spray or lining the cups with paper liners.  Set aside.
  2. In a large mixing bowl, whisk together flour, baking powder, baking soda, cinnamon and salt until combined.  Set aside.
  3. In a separate mixing bowl, whisk together egg, maple syrup, milk, coconut oil and vanilla extract until combined.  Pour this mixture into the dry ingredient mixture, and stir with a spoon until just combined.  (Do not overmix.)  Stir in the zucchini and oats until just combined.
  4. Portion the batter evenly between 12 baking cups.  Then sprinkle extra oats on top of each, if desired.  Bake for 18-20 minutes, or until a toothpick inserted in the center of the muffin comes out clean.  Transfer pan to a cooling rack, then serve the muffins warm.  Or let cool to room temperature, then store in a sealed container for up to 2 days, or freeze.
My kids always want to help, but there aren't that many things that they can do. This recipe is mostly just dumping ingredients in a bowl and mixing. So, I let them dump the ingredients and mix them. They weren't very impressed.

Bored kid alert!

The wet ingredients and the dry ingredients. And a bonus shot of my foot!

OK, this is where it gets good, folks! I had to make the zucchini really small, so I grabbed our tiny grater. I bought it for a dollar at the dollar store. It took forever to grate the zucchini, so I switched over to the larger grater.

And then I took  a really awful picture of myself using it.

See the small pieces on the right? Those are from the small grater.

After I compared the the zucchini pieces from both of the graters, I realized that I should've stuck with the smaller grater, even though it took 5 years to grate a teaspoon of zucchini. I really feel like the texture would've been better for the muffins. 

Anyway, I decided to just use what I had and hope for the best.

Off to the oven!! (I made these around Christmas hence the themed muffin cups)

I threw them into the oven and cleaned/played with the kids until the timer went off.

I proceeded to not take any pictures of them out of the oven because I forget important stuff like that sometimes.

Luckily, I took a few pictures of the kids partaking.

Mitchell shoved half the muffin in his mouth right away!

Quinn stared at the muffin for about 10 minutes before she took a bite.

Her first bite! And she liked it! They both did

Cuties!

As far as I was concerned, they came out all right. Not as good as Joe's grandmothers, but good enough to eat. Joe made sure to eat one or two every day for as long as they lasted. I never got Quinn to eat more than the one showed in the pictures. 

I can't wait to make these again using a different recipe to see if I can get them to taste a little better! I also like that this is a veggie dish without being a veggies dish and I hope to find more recipes like this with other veggies.  

Final grade: B+. They might not have been fantastic but they were still good.

Tuesday, February 2, 2016

The Monthly Recap!

A lot has happened in 2016 so far! Here are some highlights:

It Finally Effin' Snowed!:

We live where it snows in the winter. We live where it sometimes snows before Halloween. We live where traveling on holidays, especially Christmas, kind of sucks because there's so much snow/ice. We live where we were robbed of all of our I-love-to-hate-you snow this holiday season. The temperature was in the '60's on Christmas Day.

Proof: Christmas Day and none of us have jackets on!

Don't get me wrong; it was nice to not have to cart our stuff from place to place in a blizzard (like we usually have to do!). But it was kind of weird to have such great weather.

I was getting kind of worried that we'd never get our snow and then this happened:


And I finally got to wear my snowpants I bought for $0.50 except I couldn't button them because I gained weight.
We haven't gotten all that much snow yet, but we got enough that we could play in... And of course, take tons of pictures in!

We still enjoy taking family selfies in the new year, too!

Quinn Lost Her First Tooth:


The Matching Family is at it again!

It was January 18th. Quinn's tooth had been wiggly for a few weeks. Joe was at work, so I let Quinn sleep in my bed that night. I put her to bed around 9pm and by 9:30pm she was calling for me to go help her. She'd lost her tooth. Like, it was not only not in her face, it was nowhere to be found. I tore my bed apart. I crawled around the floor. I was like a madwoman. I wanted to find the tooth! I gave up around 10:30pm and re-tucked Quinn into bed.

We were really busy the next day, but I managed to set aside a few minutes in the evening to continue the search and I was glad to find it in less than 5 minutes. How I missed it the first night is beyond me!

Quinn was happy to get some money and some toys from the tooth fairy.

There's A New Baby In The Family:

No, I didn't have a baby and we didn't get a dog or anything. My niece is pregnant! I'm going to be a great-aunt! How exciting, especially considering I'm so young and not curmudgeony at all! I'm practically a baby myself! Anyway, all my siblings are older than me. They all have kids older than mine. My oldest niece and nephew are 24 yrs old! It was only a matter of time before one of them started a family. And Voila! That time is now!

The last babies in our family were my babies and this kind of cements the fact that they're no longer babies. I mean, did you read the previous part of this post about my kid losing her first tooth?! That's a big kid, not a baby. So, it'll be nice to have another baby to dote on and squish. It's all very exciting!