Monday, February 16, 2015

DIY: A Very Quick Refashion!

We've been experiencing some really horrid weather conditions lately.
 
This is my back deck.
Do you know how depressing it is to look out your back windows to see your grill, red cooler, and cute little bistro set reminding you of summer and sun completely covered in snow!?!
 
The answer is: Extremely depressing!
 
The weather has been super snowy for about 2 weeks now. I've pretty much been cooped up with the kids in the house that entire time, only going out twice. Once, to bring my kid to the dentist. And the other time was to go to the thrift store where I purchased this dress:
 
It's from Fashion Bug! I loved that store!
I immediately fell in love with the print on the fabric (I'll show you a close-up later!). It was only $0.25, so I barely inspected it as I threw it into my cart. You could imagine my surprise when I got home and tried it on to find out that it fit me perfectly! It just needed a little tweaking.
 
There were two parts to the dress that needed some attention:
 
The front of the dress was open to reveal more fabric.
 
I don't know if you can tell, but there are 10 brass/black buttons on the chest.
 
 First, I tackled those buttons...
 
Buttons on.


Buttons off!

 
Next, I pinned down those two flaps of fabric on the front of the dress.

Here's that close-up of the fabric I promised you!

And then I sewed each side down...

Nice view of my sewing machine!

And I guess that's it. That was a pretty easy refashion. I didn't even take my scissors out of my little basket of sewing/mending supplies. I wasn't expecting to be done so quickly and I had a few extra minutes, so I grabbed my iron to iron my semi-wrinkly dress.


Hi, little iron! Haven't seen you in a while! Lol...
I always forget what a little bit of ironing can do to a garment. My dress definitely benefitted from those few minutes of extra attention.

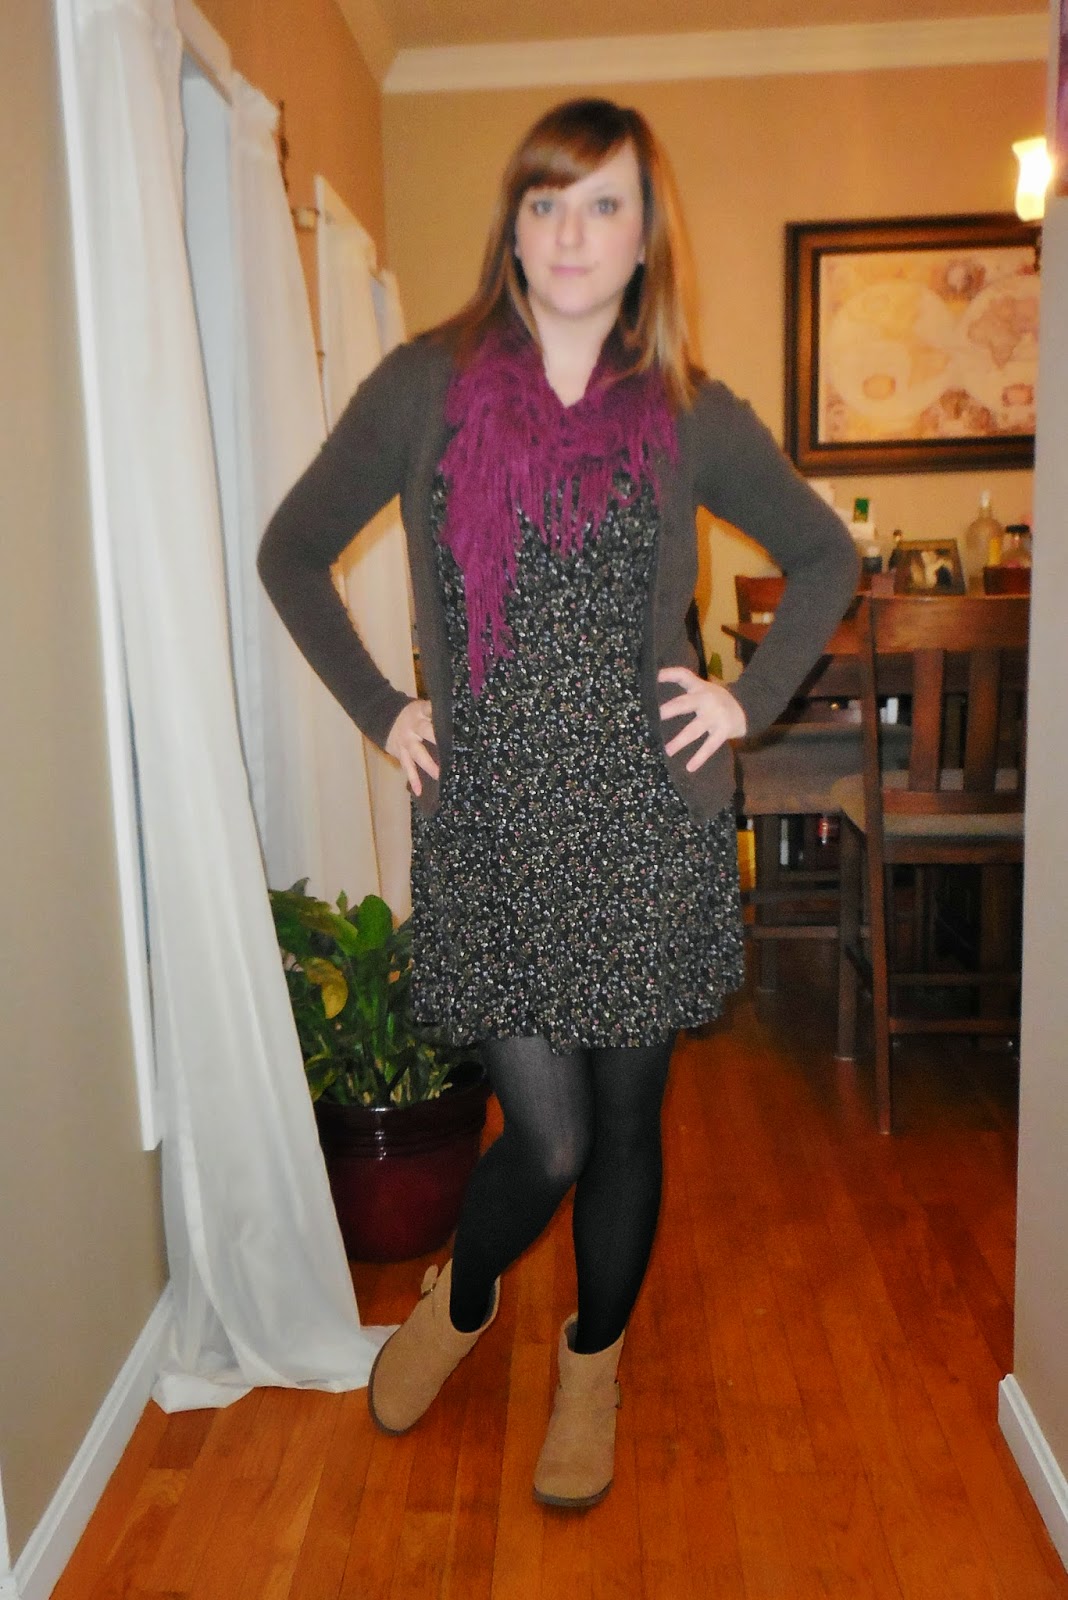
And here's my finished dress:

My camera is obviously in "blurry" mode...

You know, half the fun of doing these refashions is getting to style my article of clothing. I imagine the person who gave this frock away thought, "This dress is so dated!" Not anymore, I hope!!!


Hmm, there's a weird little light orb on my belly button from the flash.

There were 2 reasons that I fell in love with this pattern:

  1. I don't have any winter dresses that aren't solid colors. Not that I'm complaining, but I definitely had a hole in my wardrobe begging to be filled with a "Winter Floral." ya know? 
  2. It reminded me of something Angela or Rayanne would wear on my favorite '90's TV Show "My So-Called Life!!" Of course, they'd be wearing a flannel shirt over the dress instead of a cardigan and they probably would've paired it with some Doc Martens instead of suede booties, but I think you get my drift. It's an updated version of that!
 

Showing off the fact that the dress is all one piece now!

Now if only the snow would take a break for a day so I could go out and enjoy myself! I need my thrift fix! Plus I need more cute clothes to upcycle!


I always look like a creeper in my "before "pictures! Lol.


Thursday, February 12, 2015

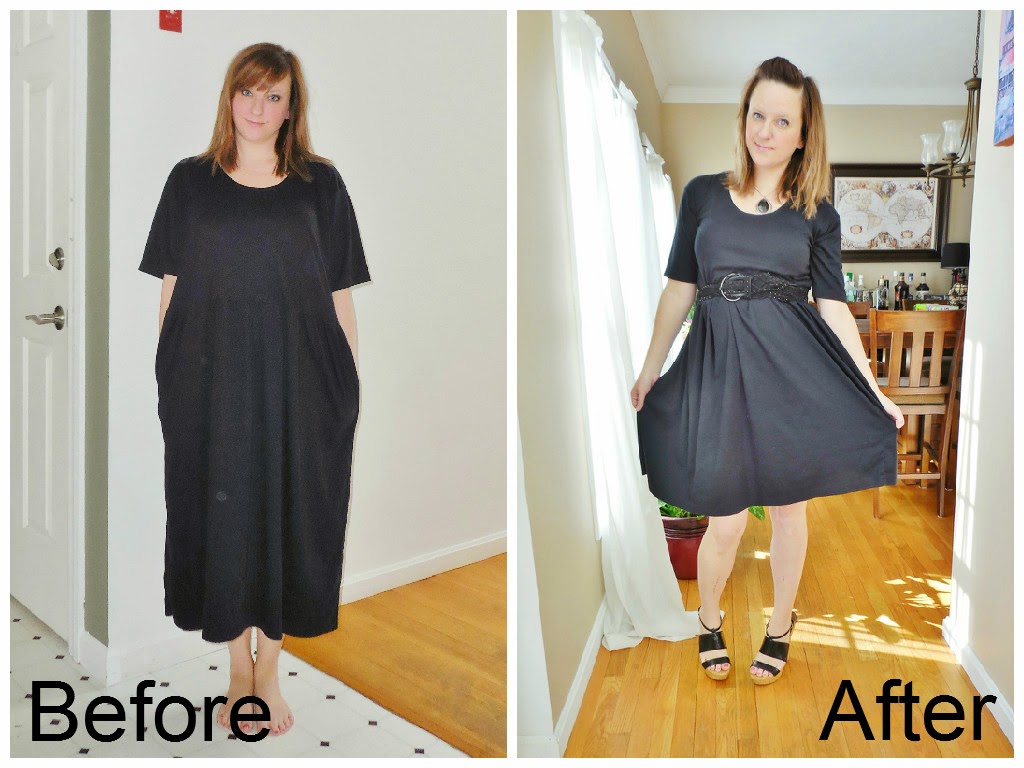
DIY: Big Black Dress Into A Little Black Dress

I got this lovely black dress from the thrift store for $0.75, making this my most expensive refashion yet!

My make up looks pretty decent in this picture. That makes me happy.
You'll see less and less refashions in the $0.50 and $0.75 price range because I've completely given up on that thrift store since the new thrift store in my area sells clothing for as little as $0.25 per item! Obviously, this dress was purchased before I started patronizing the new thrift store.

So, yeah, this refashion better come out worth the high price! Lol.

There's really nothing all that wonderful about this dress. It's a thick t-shirt material. No adornments. Nothing special to see here. But, I saw it and imagined it being a really comfy LBD (That's "Little Black Dress" for all you dudes reading this!). The only thing that sucked about refashioning this dress is that I knew I'd lose these awesome guys in the process:

No, not my leg, these awesome pockets!!

On the plus side, it looks like this dress came missing something already:

See those white/beige things? Those are the remnants of some shoulder pads!!

I wasted no time hacking into this dress myself. First up: the bodice..

Separating the bodice from the skirt.

I definitely needed to take the top portion in quite a bit. I figured this would be best accomplished by taking the skirt off so I could concentrate on the top.

My mom gave me some of her sewing stuff, including a chalk pencil do-hicky.

I tried on the top and thought I might have to take it in about 2 inches on each side. I marked it and pinned it before I realized that it would still be too big. So, I took off the shirt I was wearing, that fits me pretty nicely and used that as a guide as to how much I should take in:

Thank goodness I did this. Looks like I'd need to take it in 4 inches per side!

Once everything was pinned and ready to go, I got out my sewing machine which was threaded with white thread!!!! AAHHHH!!! Crap, I hate rethreading my sewing machine. But, it had to be done.

And I did it on the FIRST TRY!!! Woo hoo!!! I'm so awesome!

Instead of sewing a straight stitch, I sewed a zig zag stitch. Maybe that would be good? I don't know.

I cut off the excess fabric and then took a blurry picture of it.

At this point, I thought I might try on the top, just to make sure of the fit before I go any further. This is what I ended up with:

Doesn't look too bad like this!!

How cute! A little crop top! So far, so good! The top portion of my dress looks like it'll do the job, so onto the dress...
There goes those utilitarian pockets!! Boo hoo!!

I decided it would be less work to keep the original hem even though by cutting length from the top portion, I'd lose the pockets. Oh well. I'd rather save myself the hassle of attaching the dress and sewing a new hemline. I cut off the top 6 inches. I was in the mood for a slightly longer dress than what I normally wear.

Now the top portion looks so tiny!!

I almost took in the dress part of the dress, but laziness kicked in.

It took a couple of tries, but I finally pinned everything the correct way!

My last bit of sewing!!!

I checked that my kids were still alive since I hadn't really been paying them much attention. I noted that not only were they alive, but they were having a good time! I grabbed my dress and put it on (along with some shoes, a belt, and a necklace) and this is what I ended up with:

Hey there, Good Looking!
 I think I totally nailed the length! It's not too long, not too short. I think it's really flattering and gives the dress a really casual feel.

 
There's about 100 feet of snow outside. I won't be able to wear these shoes outside for months!
 My only issue is that I would've liked the top a little more fitted. When I tried it on, mid-refashion, it fit really well, but I think the weight of the rest of the dress fabric makes it seem more nightgown-y. Luckily, belts were invented to hide my sewing/fitting mistakes! The belt also adds a bit of interest, so I'm  killing two birds with one belt, so to speak.

I swear I have eyebrows. Not sure where I left them though!
I have, I'd guess, 5 or 6 LBD's but this one is the most comfortable, by far! The others are mostly above the knee. One of them is made of very wrinkly fabric. A couple of them are very fitted and at least 3 of them have low necklines! I'm so glad I found this dress because now I have a casual LBD. The perfect dress to wear during the day or to a family event where I don't want to be too sexy (like a Baptism or bridal shower or something).


I had a great time during this refashion. I ended up with a really comfy dress that I really love!

Sunday, February 8, 2015

Jill Can Cook: Chicken Apple Sausage Breakfast Burritos

A few years ago I fell in love with these pre-made Chicken Apple Sausage breakfast burritos. They were a great quick breakfast or snack on days that I was in too much of a rush to put more effort into cooking than running the microwave for a couple minutes.

When I first started buying them, they cost me $1.25 a piece. It was a little more than I like spending, but they tasted so good that they were worth the price. And it was just my luck that soon after I fell in love with them, the price on them kept going up and up until they got to be $1.89 a piece. I refuse to buy them at that price. They're good, but not that good, ya know?!

That's when I got the bright idea that I could possibly recreate their goodness on my own. And that's what I did over the weekend, with no recipe. I remembered what was in them and hoped I could recreate it with a little ingenuity. Here goes nothing!!


Chicken Apple Sausage Breakfast Burritos


Ingredients:

  • 1 package (5 links) chicken apple sausage
  • 4-5 egg whites
  • half a bag of frozen hash browns
  • 1/4 of a red pepper
  • 1/2-3/4 cup grated cheese
  • 7 tortillas
  • salt and pepper to taste
Directions:

  1. Prepare hash browns as directed on package.
  2. In a medium frying pan, fry sausage until thoroughly cooked. Cut into small pieces. Put into a large mixing bowl.
  3. Cut up red pepper, fry in frying pan. Put into the same large mixing bowl.
  4. Separate egg whites. Discard yolks. Fry egg whites in frying pan. Season with salt and pepper. Place in the same large mixing bowl.
  5. Once the has browns are cooked through, add to mixing bowl along with cheese.
  6. Mix everything together thoroughly.
  7. Place desired amount of mixture in tortillas and wrap like a burrito.
  8. Put burritos on cookie sheet and bake in a preheated 350 degree oven for a few minutes just to get ingredients warm and cheese melted.
  9. Serve and enjoy!
I have no idea what measurements I used because I just kind of guessed and added what I thought looked good and had a few tastes just to make sure everything was seasoned nicely. Sorry for not being more exact, but I think this is one of those recipes that can only come out terribly if you burn something, not if the measurements are a little off!

Frying up the chicken apple sausage.

The cut up red pepper.

Frying the red pepper.

The separated eggs.

The cooked hash browns

The filling all mixed together

So, this is another one of those recipes that you can substitute ingredients as you like. You could use any kind of sausage, add any kind of vegetable, any flavor of cheese, and you don't even have to separate the egg whites. I love that the recipe is so versatile. It is just a great starting off point, especially if you're picky like me!

The finished burritos!

This ended up taking a long time to make, even though it seems so easy. This is mainly because I cooked everything piecemeal. It was more worth it to me to waste time cooking everything in the same pan, one after the other, than to cook everything at the same time in different pans. I hate doing dishes! But you don't have to do it that way, unless you want to.

Joe was really impressed, not only because these came out so deliciously, but because I didn't even have a recipe! I finally have a little bit of imagination! Woo hoo!  Haha, anyway, these didn't taste anything like the prepackaged ones (I blame the Mexican cheese and the fact that I used red pepper instead of green pepper), but neither Joe nor I cared. They tasted a whole lot better. I ended up making 7 super filled burritos (twice the size of the store bought ones) and I worked it out that they cost about $1.00 per burrito (that's almost half the cost!). Joe and I ate 3 of them that first day and I put the 4 remaining ones in the freezer, to be heated up when we need a simple meal in the future.

Definitely worth all the trouble!!!

The best part of this whole meal was when Joe said, "I can't wait to make these for the guys at work! I only hope I can do a good a job as you!" Aww, that's the best compliment EVER!

This recipe definitely gets an A+ in my book. I don't think the 4 in the freezer are going to last too long so I'm sure I'll be making these again soon!

Friday, February 6, 2015

Jill Can Cook: Arancini (Rice Balls)

Joe and I make stir fry for dinner pretty regularly. Every so often on those nights, I end up with extra rice that I have no idea what to do with. I mean, what can you really do to already cooked, plain white rice other than eat it with a stir fry? And I really don't look forward to making stir fry two nights in a row.

I poked around for ideas and found this recipe at Just Taste for an Italian dish called Arancini. I'm not Italian and neither is Joe, so this whole idea of Arancini was new to both of us. But, what the heck; it looked easy to make and we had all the ingredients, so I gave it a shot!


Arancini (Rice Balls)


Ingredients:

2 cups cooked white rice, cooled
1/2 cup grated cheese
3 eggs
8 small cubes fresh mozzarella
1 cup Italian-style breadcrumbs
salt and pepper, to taste
1 tsp Italian seasoning
Oil, for frying

Directions:
  1. Place a large heavy-bottomed pot over medium heat and add enough vegetable oil to rise 4 inches in the pot.
  2. Combine the rice, cheese, 1 egg, salt, pepper, and Italian seasoning in a medium bowl and use your hands to thoroughly combine the mixture.
  3. Form each arancini by taking a small portion of the mixture, squeezing it firmly and stuffing one cube of mozzarella inside each ball. Repeat this process to form 8 arancini.
  4. Whisk together the remaining 2 eggs. Dip each arancini in the eggs and then in the breadcrumbs, shaking off any excess.
  5. Once the oil reaches 375ºF, add 2 or 3 of the breaded arancini to the pot and fry them until golden brown and cooked throughout.
  6. Use a slotted spoon to remove the fried arancini from the pot and transfer them to a paper towel-lined plate. Immediately salt the arancini. Repeat the frying process with the remaining arancini.
  7. Serve the arancini warm with a side of warm marinara sauce.
 
This recipe really couldn't have been any easier. Since I'd cooked the rice for a different meal, all I had to do was pull the Tupperware of rice out of the fridge and mix everything together. Here are some pictures of the process:
 
 
Everybody in the bowl!!
 
I didn't have mozzarella but I did have string cheese, so I just cut one up into 8 pieces.
 
My balls before I breaded them.
 
My balls after I breaded them.
 
 
My finished balls!!
 
My golden, salty balls!! Yum!!
 
Not to brag, but these rice balls came out super yummy! The original recipe told me to use parmesan cheese, but I only had Mexican cheese on hand. And the original recipe didn't call for any extra seasoning, but I didn't want bland balls, so I made sure to add salt and pepper. Plus, I still wanted them to be somewhat Italian, so I threw in some Italian seasoning. This made them taste like a Mexican/Italian fusion ball.
 
Joe wasn't too sure that he'd like my balls because the main ingredient is boring, plain white rice, but he was pretty impressed when he cracked into the crunchy outer shell and was greeted with steaming, cheesy, very well seasoned rice.
 
The only issue I had with this recipe was the mozzarella in the middle. I guess my string cheese was too solid/not soft enough because it really didn't melt in the middle like I'd hoped. It was just a lump of warm cheese. It didn't suck, it just wasn't what I was hoping for. Next time, I might skip that part.
 
We made 8 big balls. We ate a couple that day and ate the rest over the course of the next couple of days (they were VERY filling balls!!). If you make these and decide to reheat them, be sure to do it in the oven as micrwaving them will ruin the great texture of the outer ball!
 
A+ for this recipe. I can't wait to make them again!


Sunday, February 1, 2015

The Weekly Recap!

I've been doing so much cooking and refashioning that I pretty much forgot about my "Weekly Recaps." So, this one will be more like a "Monthly Recap."

Hello 2015, Good To Meet You:

Joe and I spent New Years eve pretty low key. We stayed home, watched "The Giver" (which we really liked), and got to bed with just enough time to say "Happy New Year" to one another before passing out.

It's New Years day that's the special day for our family. My extended family gets together in the afternoon on New Years day, giving those of us that actually have awesome plans the night before some time to recover. We all get together to hang out and eat yummy Chinese food.

This year, we ate our Chinese food, then went back to my parents house for more hanging out. We also had the chance to take some awesome pictures...

Me, with my niece, Jazmyn, and my mom,with Mitchell photobombing in the background.

Joe and I in our first picture of 2015!


Our Favorite Thrift Store:

It's no secret that my mom and I hit up a few Goodwills/thrift stores in our area once a week. But a couple of months ago the prices went up at Goodwill. And last week the prices went up at our favorite thrift store. The prices didn't go up all that much. The $0.50 rack is now a $0.75 rack and regular priced merchandise went up $0.50-$0.75. It's not going to break the bank, but it sucks that prices have gone up.

Luckily, a new thrift store opened up in our area and even though my mom and I have only gone to it a couple of times, I think it might become the only place we'll go from now on as it now has the best prices.


I Downsized My Diaper Bag:

New year, New bags!

I've been carrying around that big, bulky green/black Eddie Bauer Diaper bag for the last 2 years. Before that, I had a humungous pink diaper bag. I realized recently that I only really need a bag to carry some diapers, wipes, and a snack or two for the kids. I've been carrying around the tiny Elmo backpack (that I scored for $.90!) for the last couple of weeks and let me tell you, it's life changing!!


Speaking Of Bags:

I know I'm going to LOVE these!!

I go to the store, I buy 10 things and the clerk puts each item into it's own plastic bag. So, buying these reusable shopping bags was a culmination of a few things:

  • I am sick of the clutter of the plastic shopping bags that I have no use for.
  • It sucks having to carry 10 plastic shopping bags into the house along with all the other stuff I have to bring in, plus kids, up a flight of stairs, in the dark, in the winter, during a blizzard, 5 miles and up hill (blah blah blah, you understand my plight!).
  • I am trying to be more eco-friendly and not leave a huge carbon footprint.
  • These bags have more use than just shopping, we can use them when camping or taking day trips as they are big, different colors, and very sturdy.
I purchased 10 of these bags and it cost me $17. They don't fold into tiny little squares or anything, but I don't care. I wanted the strongest yet cheapest ones. These definitely fit the bill! We recently bought groceries and instead of leaving the store with 20 plus (I'm not even kidding) plastic shopping bags, we filled 5 of our reusable bags and got 2 plastic bags for our meats. That's it, 7 bags. I'm quite impressed. I'm even thinking of bringing these bags with me when going to the mall and other non-food stores. I have no use for a Victoria's Secret or Old Navy shopping bag.

It's not like this whole idea is new to me. I have actually been using a couple flimsy reusable shopping bags that I already have. I just haven't really committed myself to it and now that I have my heavy duty bags, I am going to be hardcore about bringing them everywhere with me!