Thursday, August 20, 2015

Finished Project: Reimagined Picture Frames.

In the interest of saving money on my master bedroom remodel, I've been scouring thrift stores and clearance racks for items I think would work with the new décor. Normally, the biggest part of my budget would be spent on wall art, because, let's face it, that crap's expensive. I don't think I've ever seen any wall art at Home Goods for less than $30 and even the cheaper stores aren't that much cheaper.

I had some luck at a semi-cheap store in my area called, Family Dollar, where I picked up a couple new frames (with pictures of chairs in them. How random) for $1.80 apiece. I also found a couple of wood frames at the thrift store I frequent for $0.50.

I thought about not upcycling the chair frames, but where's the fun in that?!

Walking through my local craft store, I wandered into the scrapbooking aisle, where I found some scrap booking paper on sale for $0.19 per page. And BONUS: they're decorated differently on both sides!

I didn't want to be too matchy matchy so I grabbed these completely different pages.

It was pretty simple after that. I just cut each page down to size and placed it within the frame. For the cloud one, I used the other side of one of the scraps and put it with it just to make it a little different.

I love them!

A slightly closer view.
....That's not it though, I have some more frames that need my help. These were purchased during my numerous thrift store outings,too,but unlike my other frames, these would need to be painted.

Each on of these cost me $0.50 at different thrift stores/Goodwill.

I got the idea for what to put inside of these frames a couple of weeks ago when I was rifling through old books at the thrift store. I saw some old illustrated books about animals and thought, "these pictures would look pretty cool on my wall." So I picked out a couple of books (at $0.10 per book).

The two books I decided on. I have no idea why I got the cross stitch one. Lol.

I'm starting to have a little hoard of spray paints in my basement.

I grabbed a couple of spray paints, some newspapers, and my frames and painted them outside really quickly. They dried in no time! I love spray paint! Then came the task of figuring out which pictures to put in which frames:

This horse picture is the picture that originally gave me this idea!

I'd let Quinn paint earlier in the day and this was one of her masterpieces. Matches the frame pretty well.
Just to change it up, I decided to use a sketch from the book as opposed to a color print.


OK, I might not keep it, but I tore out this cross stitch picture just to see if it would look dumb. The jury's still out on it's ugliness.

They're not so awesome looking on my floor, but they'll be awesome on the walls!

I'm really looking forward to being done remodeling my bedroom. I can't wait to see how everything looks together. I'm hoping to have it completed by the end of the summer, but who knows, considering the original modeling was never actually completed! It's the room I put the least amount of effort into because it gets the least amount of visitors! Hahah

Keep an eye out for these pictures in other blog posts in the mean time because they might get re purposed into other rooms!

Thursday, August 6, 2015

Finished Project: Painted Ikea Dresser.

There's this store called Ikea and I drool every time I check out their website. I'm not sure if there are any Ikea's in Peru or France (I assume that's where you guys live because my blog tracks the countries of my visitors and you guys are my most loyal fans! Thanks for reading!), but there's one in my country. The only problem is that it's 8 million light years away from my house, even if you speed to get there.

Lucky for me, my husband and I had to drive down to that area for a family event and left EXTREMELY early so he could buy me stuff from Ikea.

I only bought two things (I really wanted to buy about 47 things, but I somehow managed to hold back) = a cabinet thing for my dining room and a dresser for my bedroom.

I picked an unfinished dresser because I wanted to transform it. I had a beautiful blank canvas to work with after my husband slaved over assembling it for me:

Thank goodness for big driveways!

I decided to paint it white with a silver accent. That way, I could repurpose it without repainting it. So, I grabbed all my materials:

Paint, paint brush, spray paint, and lace. Maybe you already know where this is going.

I took the drawers out and painted everything white.

This is a horrible picture, but you can still tell the drawer fronts are white.

I needed to take a bit of a break to let the dresser/drawers dry, so I pretended to be a model...

It's hard to be a model.

I ended up painting two coats of white just to make sure I had the best base for what I needed to do next...

But, wait... At that same moment, Joe was playing with his chainsaw in the front yard.

He's so manly, I'm surprised I was able to get any work done!!

He sent Quinn over to me to show me something in their pail...

A big huge frog!! Gross. I haven't taught her to be scared of frogs yet on purpose or accident.

Anyway, Husband, stop being so sexy. And Kids, stop being so cute. I have a dresser to finish painting!!

While waiting for the second coat to dry, I spray painted the drawer pulls.

Drawer pulls before.

Drawer pulls after.
Back to the drawers. This is the part that makes this project blog worthy.

I laid the lace lovingly over the drawers...

I paid $0.25 for it at the thrift store a couple of weeks ago.

I tried to model with my spray paint to make my spray paint seem more interesting.

Then I sprayed as evenly as I could over the lace/drawer.

The sun makes this look pretty ugly, but it looks really cute in person!

I did this to all the drawers except for one. I decided to keep at least one drawer white to, hopefully, add some drama.

Remember the blue lamp shade?! I bought a new lamp for it.


I am pleased with how my dresser turned out. I like that it adds a little interest in my boring bedroom. My remodel is coming along quite nicely and I can't wait for it to be finished.

I could've done a better job making it even. I don't know how, but I'm sure it's possible.

A close up picture.


One thing to mention though: I'd have liked the design on the lace be more prominent. Thinking back, if I'd taped it down on all four sides, I might've gotten a more striking design. Oh well. I hope that information helps if you decide to do a version of this on your furniture.

Sunday, August 2, 2015

I Had A Bit Of A Makeover... Again!!

As you all may know, I dye my hair a lot. But what you might not know is that I now live somewhere that has well water and from what I've read, it has minerals and stuff in it that can be really tough on hair, especially dyed hair. So, I took a break from dyeing it.

I hadn't dyed my hair since New Years Eve and up until recently, I looked like this:

At my parents house to celebrate Father's Day. Mitchell didn't really feel like taking pictures.


Not bad.. But not too interesting either. Although, I will sing the praises of not dyeing my hair for the last 7ish months:
  1. I saved some time.
  2. I saved some money.
  3. I didn't worry about my roots growing out.
  4. And most importantly, I ascertained that I have absolutely no gray hair!! Woo hoo!
Anyway, I got bored with my hair.

I asked my husband and my mom if they'd think I was nuts to go completely outside of the realm of "natural hair colors." Both of them told me to go for it. It'd be cool, not poser-y.

On a whim, I went to the store and grabbed some funky hair dye and this is what I look like now:

Why is the quality on my camera phone so poor?! I spent quite a bit of money on it!


I didn't do the greatest job in the making the color even department, but it was my first try. I was nervous that I'd dye my entire head and face blue, so I held back a little.

I took my blue hair to the beach and got A LOT of stares!!


I am thrilled with it, though. I want to continue to have blue hair (at least for a little while). Joe also loves it. He thinks it's very rock and roll a la Katy Perry.

OK, so maybe not exactly Katy Perry, but her essence.


My mom also loves it. In fact, I kind of talked her into dyeing her own hair a funky color (well, hers is wash out so it'll only last a week or two, but it still counts).


It's too bad hers washes out so fast. We make a cute couple.


I've had a few compliments on my bright blue hair, mostly from Facebook friends. Most people I see on the regular are pretty silent on the whole thing. I'm thinking their silence is because they don't like it or think it's not me or something. And to them, I'd like to say this:

It's fun to take chances and go outside the norm sometimes, especially when it doesn't hurt anyone. For me, my YOLO ("You Only Live Once," for people who might not know) moment was slathering my head in blue hair dye, but your YOLO moment might be something totally different.Go out and have one. Come back and tell me all about it because I bet it'll be awesome and make you happy and vibrant and that's what life's about!!! (Too many and's? Probably, but I'm not a professional writer, so please don't be too hard on me! Lol)

I've been living it up at the beach this summer, too!!

So, now when you see my blog pics with blue hair, you won't worry there's something wrong with the color/saturation settings on your computer.

P.S. I dyed my hair blue about 10 days ago and it's already faded to a greenish color. If I plan to keep this up, I'll need to figure out 2 things:
  1. How not to ruin my towels or shower.
  2. How to make the color stick around a little longer!
Any help is appreciated as I'm in no rush to go back to human hair colors!!


Thursday, July 30, 2015

My Closet: Outfits Of The Season!

In honor of the beautiful weather we're having, I thought I would blog about some outfits I wore this winter.

When I put together an outfit I really love or feel really good in, I take a picture of myself in it. I started doing it to give myself ideas on clothing items I feel awesome in. That way, when I have no idea what to put on in the morning, I can scroll through my outfit pictures and give myself some inspiration. I'd also like to mention that I don't usually share these pictures. Sometimes I do, but most of the time I keep them to myself.

I don't know who exactly is reading this blog, if anyone even is! But maybe you could use a little inspiration, too. Or maybe you do the exact same thing and we're kindred spirits. Or maybe you're a crazy psycho killer who likes reading blogs about boring things. It doesn't matter. All that matters is that someone is reading this!!

Anyway, I feel like I'm getting off the point. Lol. Here are a few outfits I put together this past winter that I loved enough to share.

I have a lot of fashion scarves!

BTW, these are all horrible quality pictures. Hahaha.. Minus the boots that I got at Charlotte Russe, the rest of my outfit (scarf, brownish heather shirt, and pink jeans) all came from various thrift stores and all together only cost me $4 or so. I love how the knee height boots cover a little bit of the pink jeans so it's not too much pink, you know?! The sleeve length on the shirt is extremely flattering. And I just feel really tall and slim in this silhouette!

Hello, stupid face! Good to see you're back!

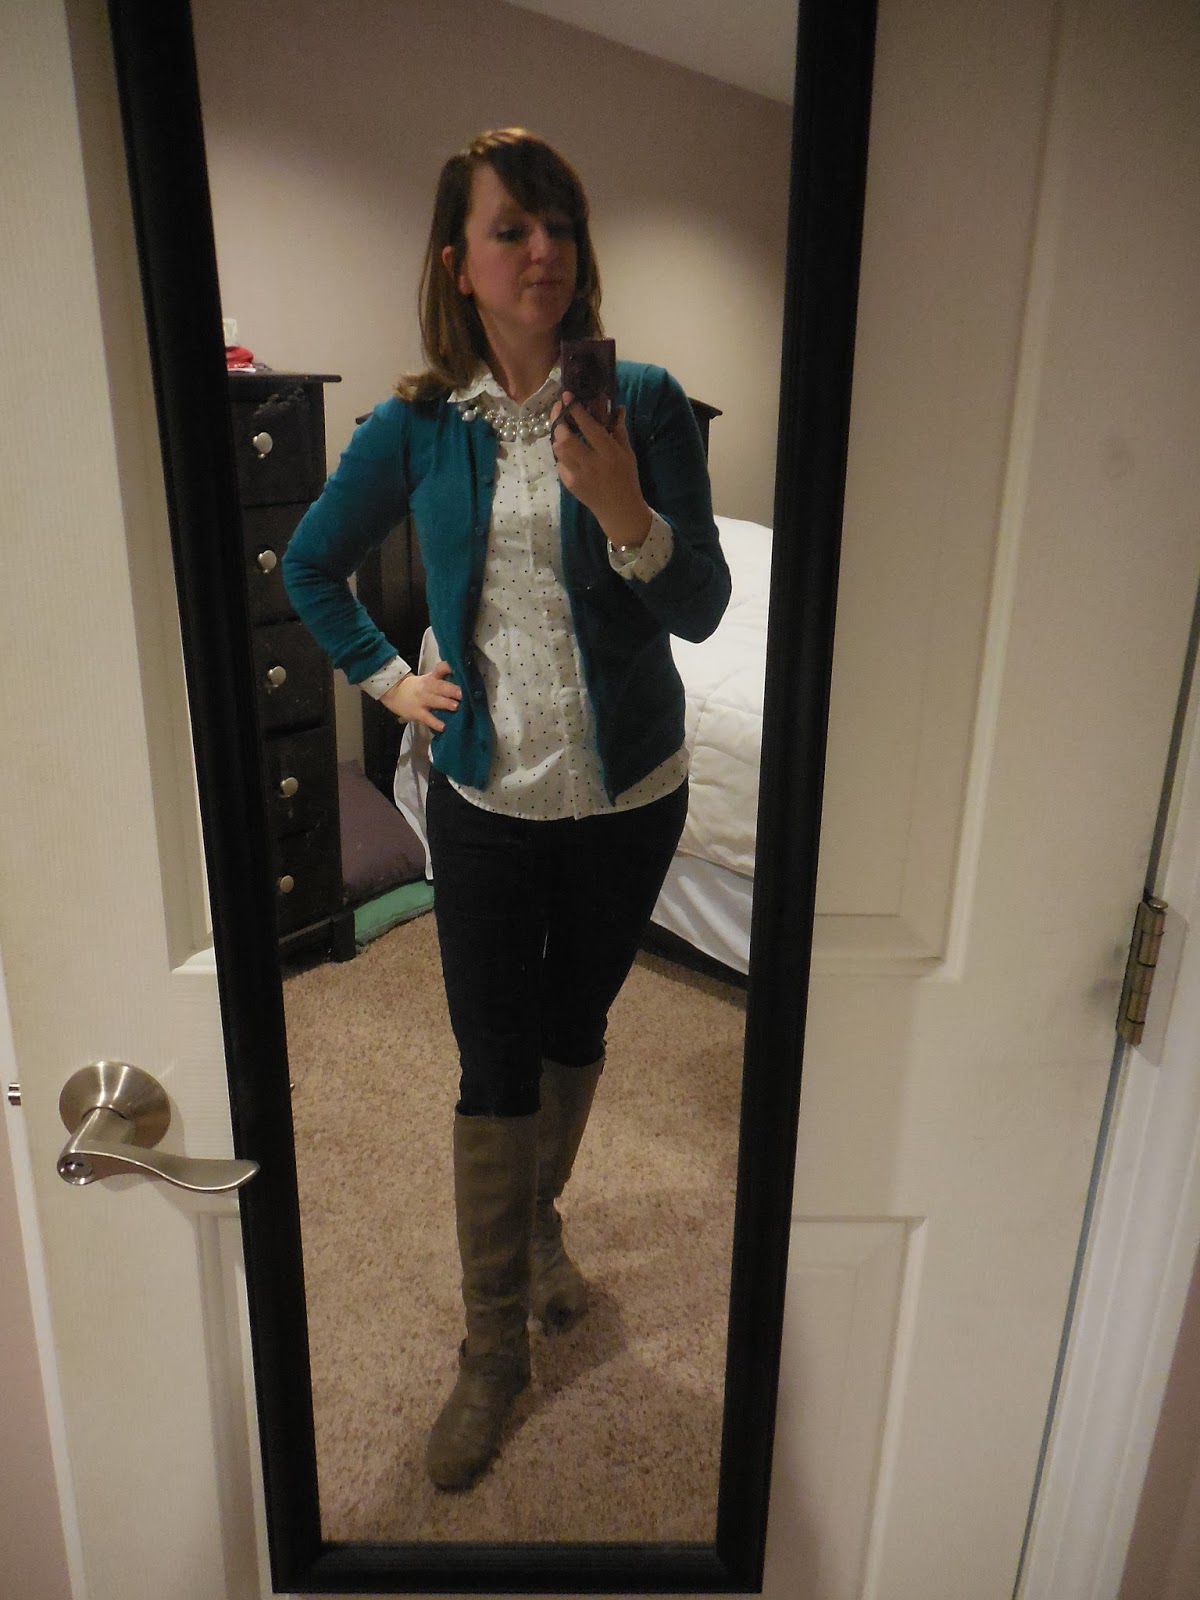
I bought this white with black polka dot blouse at Old Navy with rewards points, so technically it was free. Skinny jeans are from Forever 21 (they sell for $7.80 and since I bought my first pair there, I've found several more at the thrift store for $0.25!). The cardigan is a thrift store cheapy and I have tons of them. This is just one time of many that I wore this ensemble. To change it up, I just wore it with different cardigans (I have about 60 of them, so I have endless possibilities). The great thing about this outfit is that it's comfortable and is a no-brainer on days that I want to look put together without the hassle!


Sometimes, you just luck out!

Charlotte Russe boots, F21 skinny jeans, and a purple turtleneck made of very polyester feeling fabric! First off, I hate turtle necks and I hate this fabric. I have no idea why I scooped it up for $0.50 back in the day. I must've been desperate. But let me just admit, I love it. The turtleneck, is low enough to not annoy me and I think the way the fabric falls adds a little drama to an otherwise boring ensemble. I look at this outfit every so often to remind myself that sometimes it pays off to try something out of your comfort zone!

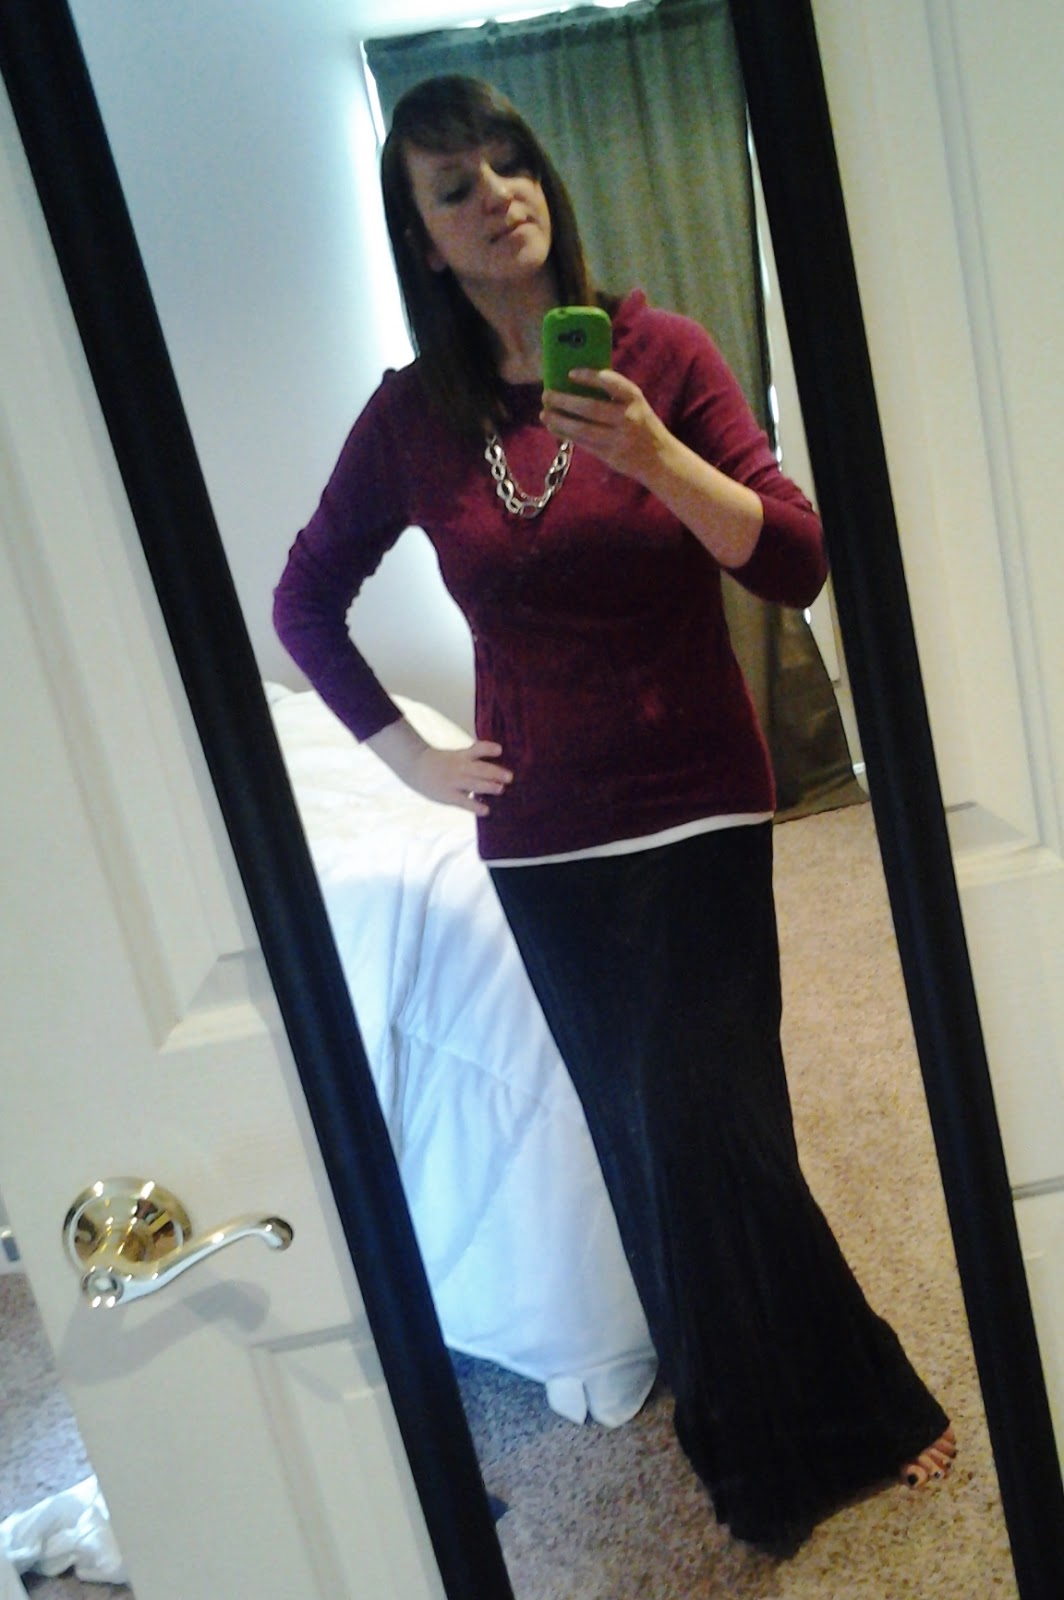
I don't always wear pants... I mean.. err.. You know what I mean!

I always thought maxi skirts were for tall people or people with smaller hips; pretty much anyone besides someone with my shape. In a hopeful mood 6 or 7 years ago, I ordered this skirt online. It was $12, I think. I would try it on every now and again and I'd just hate it on me. For whatever reason, when I paired it with my thrifted Gap sweater and long necklace I got at Goodwill for $0.90, it just worked. It's nothing fancy, but I feel kind of fancy in it. Regal, even. I don't know. Maxi skirts are still pretty tricky for my shape, but when they work, it makes it worth it! So, I bought a couple more!

My white t-shirt is a little shorter than I like but I like the overall look.

Charlotte Russe Scarf. Pants $10 from www.10dollarmall.com. Everything else was thrifted. Well, except for those shoes. Ballet flats from Wal-mart. I bought them for $2. They were my first pair. I am not a "sneakers" person, so I stick with heels or wedges. I'm glad I found these ballet flats though. I like having another option in the footwear department that makes it easy to chase after my kid who still gets into everything! For a while, I thought "These are not me at all." That is, until I put them with this outfit. That was about a year ago. Nowadays, I own at least 7 pairs of ballet flats. I just love them!

Looks like I'm hiding a dead body under the bed! Yikes. I need to hide it better!

I love a pop of color and I love chunky statement necklaces. Charlotte Russe boots and F21 jeans again. (I wear F21 jeans almost exclusively!). The statement necklace is from Charming Charlie. I got it during a big sale and it only cost me $5 (I've gotten better deals elsewhere, but that's the best for that store!). I have lots of jewelry and I don't always remember to wear it. I don't always know which piece will look best with which outfits. It's great to have a little reminder that this necklace looks great against a high-necked t-shirt.

And that's it for now, I guess. I'd like to do more of these as time goes on, but not too many. I'm sure you guys (the both of you and my mom, HI MOM!!!) weren't too bored, but I think you might be less bored if I made some junky food and painted some stuff!

Monday, July 6, 2015

Jill Can Cook: Apple Pie Empanadas

How this recipe came to be will definitely not surprise anyone.

I bought some Pillsbury cinnamon roll biscuit/buns in a can. You know what I'm talking about. I have no idea what they're called. All I know is I had never made them before, they were on sale, and I was totally feeling some cinnamon buns. Between buying them and actually making them, Joe ended up buying me a huge cinnamon bun from Cinnabon's.

I can't tell if the guy loves me or hates me. Those cinnamon buns are so good, but so fattening and bad for you. This also proves that he definitely doesn't listen to me because why would he buy me that which I planned to make?! But his not listening to me resulted in a delicious cinnamon bun the size of my head, so can I really complain? I mean, really... Cinnabon's.

Anyway, this post is not about the inter-workings of my marriage. It's about how my Pillsbury can of cinnamon buns was about to expire and I was all cinnamon bunned out.

Then something kismet happened: My mother gave me a big bag of apples. She told me my brother gave her 2 big bags of apples. She didn't know what she was going to do with all those apples. And then proceeded to sneak a bag into my car. Hahaha I'm kidding.  (she made my dad do it!)

That's when I got the bright idea to make apple pie pockets. I prefer to call them Apple Pie Empanadas. It sounds more exotic and less bad for you!

I found this recipe at Tablespoon.com and grabbed my ingredients:

Apple Pie Empanadas


Ingredients

  • 2 granny smith apples
  • 1 tbsp. ground cinnamon
  • 1/2 tsp. ground nutmeg
  • 2 tbsp. brown sugar
  • 1/2 tsp. vanilla extract
  • 1 can (16.3 oz.) Pillsbury Grands refrigerated biscuits
  • 1 egg, lightly beaten  
  • vanilla icing to drizzle over top                                      

Directions

  1.  Using a mandolin or sharp knife, core and thinly slice the apples into wedges.
  2.  Toss the apple slices into a medium skillet. Add the cinnamon, nutmeg, vanilla and brown sugar. Sauté on a medium heat for 5 minutes, or until the apples have softened a little bit.
  3.  Transfer apples to a small bowl and stick them in the fridge for 15 minutes, letting the apples cool.
  4.  While they cool, preheat the oven to 375°F. Roll out the biscuits on a floured surface until you get roughly 6-inch circles.
  5.  Evenly distribute the cooled apples among one half of the 8 biscuits.                           
  6.  Fold over the biscuit dough, pinching the ends together to create an empanada. Then, using a fork, crimp the edges to make them ridged.
  7.  Place each empanada on a rimmed baking sheet, lined with parchment paper. Then brush each one with a light egg wash. Bake for 15-20 minutes, until the tops are golden brown.
  8.  Lightly dust with more cinnamon and/or vanilla frosting/glaze and serve immediately.
 
OK, there's a lot of fail in this post, but don't fret my pet, these came out pretty good!
 
Joe was just hanging around the house when I decided to make this for the 4 of us as an after dinner treat. I can never open the Pillsbury cans, so I pleaded with Joe to do it for me. Good thing I did, too, because it took him a while to get it opened, too (any advice on how to do this without killing yourself is welcome!)
 
While he opened the worst can in the universe, I peeled my apples...
 
I peeled the whole apple in one long piece!
 
 
This is where the fail happens. Joe finally gets the can open and 'lo and behold, they're weird. They're not biscuit, they're strips. Of course they're strips. They are meant to be cinnamon buns. Also, they're covered in cinnamon and sugar which makes sense because (and why didn't I think of this when I was planning this recipe out?!!?!?!) they're cinnamon buns.
 
I was a little sad. I had high hopes for this recipe. I didn't want to give up! Joe, my awesome supporter, told me to work on the apple part of the recipe while he tried to finagle the cinnamon bun weirdness into something we could work with.
 
So, that's exactly what I did.
 
I cut up the apples into small little pieces.
 
I put all the ingredients into the pan with the apples.
 
I sautéed the mixture on the stove until the apples were nice and tender.
 
I worried the entire time.
 
And then I peeked over at what Joe was up to.
 
Heck yeah, dude!! You rule!!
 
Joe managed to stick everything together and even peel off a good amount of the cinnamon/sugar mixture. We had ourselves a workable dough. Granted, it was not perfect, but it turned out WAY better than I thought.
 
(and, yes, we got that t-shirt when we visited California, right after we got married!)
 
We're doing the best we can, folks!
 
This wasn't going to turn out too pretty, I knew that right away. We figured we'd just make 4 empanadas. We had just enough mixture to do so.
 
They look really gross right now!! HAHA
 
Oh that egg looks awful on the top. Since then, I've purchased one of those cooking paintbrushes so I can just paint the eggs on instead of blobbing them on.
 
And off these little uggo's went, into the oven, to cuten up.
 
I told you they'd get cuter and I don't lie! (Well, my hips don't lie, at least).
 
I grabbed the little can of frosting the cinnamon buns came with and put some on top. These smelled so enticing!! Joe and I loved how they turned out, even though the kids were not too impressed.
 
Mmm..
 
I wrapped the 3 we didn't get a chance to eat that evening individually and threw them in the fridge. These were great for an on-the-go snack. They were great to have for breakfast. They'd have been better had we started out with the right dough, but they were still pretty easy and yummy. This recipe gets an A from Joe and I. The kids, well, they're sometimes tough to please unfortunately.