Friday, December 26, 2014

Jill Can Cook: Bacon Wrapped Weenies

I've gone to several parties recently and have gladly eaten more than my share of Pigs in a Blanket. These weren't served too often at parties when I was younger, but they seem to be a staple everywhere I go nowadays. I love that they're bite-sized (well, maybe two bites if I'm feeling ladylike), pretty simple to make, and seem to be liked by everyone.

I wanted to make them for the big family Christmas party at my parents house on Christmas day, but I wanted to take them a step further. I feel like at this point, everyone going to the party has probably had regular ol' Pigs in Blankets and I didn't want my contribution to get lost in the crowd. I had to be unique. I had to be bold. But I had to make something people would actually *want* to eat. I searched around for a bit and found this recipe at TastyKitchen.com, and decided to make them. I mean, who doesn't love bacon? (Well, me, kinda.. I'm not a super huge bacon fan, but I do like it)

Bacon Wrapped Weenies

Ingredients

I only photographed one package of weenies, but I ended up making 2 full packages.

  • 1 pound Bacon, Cut Into Thirds (I cut them into quarters)
  • 2 - 32oz Packages of Cocktail Weenies
  • 1 stick Butter
  • 2 cups Brown Sugar
Directions:

Preheat oven to 375F.
Cut the bacon into thirds (or quarters) and wrap each smokie.
Place all the wrapped smokies in a single layer in a baking dish.
Then melt the stick of butter and then 1 cup of brown sugar and stir until mixed well. Pour the butter and brown sugar mixture on the smokies and bacon.
Then take the other cup of brown sugar and sprinkle evenly over the smokies.
Bake them for about 15-20 minutes and then turn the heat up to 400F for about 5 minutes or longer until the bacon becomes crispy.


First of all, I wasn't sure how many of these things I would make as I had never made them before. So, I bought two packages of weenies and figured I could make one batch now and one batch some other time. As it turns out, one package looked a little light, so I made both. Also, my bacon was really thick or long or something and in order for them to cook properly, I made the executive decision to cut them into quarters as opposed to thirds. This worked out perfectly because I had just enough bacon and smokies to finish off those ingredients.


They're not even finished yet and they already look so yummy!

The cutting of the bacon and wrapping up the little weenies took a good amount of time. Maybe like 20 minutes or so. It wasn't tough, just time consuming. The great thing about this recipe was that I could do all the prep work the day before so when I finally got to the party, all I had to do was pop them in the oven. The hardest thing about this dish was carting it to all of our stops in the earlier part of the day, finding a refrigerator for them, and not forgetting to bring it with me to the next stop.

Mmmm..

Luckily, we did not forget them at any of our stops and we easily popped them into the oven when we got to my parents house. They cooked in the oven, I took them out, ate one, and then took this picture, which is why there's a teeny, tiny hole.

There was a great spread on the table before these were ready to be served. My mom did a fantastic job. In fact, she put together an entire meal for everyone! I was only worried that everyone would be too full to partake of the greatness that these turned out to be.

So, I decided to take the bull by the horns and walk around, like a 1950's housewife or high end caterer, offering them to everyone, holding onto the pan by a potholder with one hand and a pack of toothpicks in the other. It was too bad that the pan was so hot because I wasn't able to linger for people to have several of them before moving on to the next person.

The pan was about half empty by the time I laid them in their spot on the table, among all the other delicious offerings. Every time someone saw me without them, they'd ask, "Where'd you put the weenies?!" It was a total hit!! I couldn't have been more thrilled.

I made sure to get another picture before they were all gone!!!

I love it when I can find a recipe that doesn't need a whole lot of ingredients or a whole lot of attention while cooking. It's also a plus if the food comes out deliciously as well. This recipe was all of the above. Even though everyone was probably really full and busy mingling, everyone made it a point to have one and to keep going back for more.

I think if I make this again, I might forgo adding the butter. I think it might've made it a little soupy. Even though the soupy sauce was very delicious, once a good amount of the weenies had been eaten, the sauce made the rest look a little weird.

Wednesday, December 24, 2014

Jill Can Cook: The Best Chocolate Chip Cookies Ever

It's been years (seriously, YEARS!!!) since I've made cookies from scratch. The only time I've not made cookies from prepackaged mixes is when someone's given me one of those mason jars filled with all the dry ingredients, so all that needs to be done is adding the wet ingredients. I definitely do not prefer the prepackaged stuff, it's just that it's easier.

In the last couple of years, I've moved a couple times, been pregnant, had newborns, breastfed, and have not always had the luxury of being a stay-at-home mom, so I'd all but given up on making my sweets from scratch due to being busy with other stuff. But... I finally have a little bit of time and lots of desire, so I searched and searched online (for like 5 minutes, maybe 6) for a cookie recipe that would be perfect for my first (in a while), awesome batch of cookies from scratch. I only hope they deliver the wonderful goodness they promise!!
 

The Best Chocolate Chip Cookie Recipe EVER!

 (I didn't start with this recipe, but I followed it back to Savory Sweet Life)
 
Ingredients:

I always forget something.. Like the other stick of butter! Don't worry, I cooked with it, just didn't photograph it.
 
  • 1 cup (2 sticks) salted butter, softened
  • ½ cup sugar
  • 1½ cup packed brown sugar
  • 2 eggs
  • 2 tsp. vanilla extract
  • 2¾ cups (12 oz) all-purpose flour *If at all possible, please weigh the flour
  • ¾ tsp. smallish-medium coarse sea salt (or 1/2 tsp table salt)
  • 1 tsp. baking soda
  • 1½ tsp. baking powder
  • 2¼ cups semi-sweet chocolate chips (I added some white chocolate chips)
Directions:
  1. Preheat oven to 360 degrees.
  2. Cream butter, sugar, and brown sugar until it is nice and fluffy (approx. 3 minutes on medium-high speed).
  3. Add both eggs and vanilla and beat for an additional 2 minutes.
  4. Add baking soda, baking powder, salt, and flour until cookie batter is fully incorporated.
  5. Finally add chocolate chips until well distributed. The cookie batter should be somewhat thick.
  6. Optional: Refrigerate cookie batter for a few hours before baking. This will help them keep their shape!
  7. Drop about 2 tablespoons of dough or use a medium cookie scoop and plop the batter onto an ungreased baking sheet.
  8. Bake for 12-14 minutes until the edges are nice and golden brown.
  9. Remove from heat. Allow the cookies to stay on the cookie sheet for an additional 2 minutes, then move to wire cooling rack, or wax paper. 
  10. Makes 48 cookies.
 
 
First of all, I don't have any semi coarse sea salt. Only really chunky sea salt. So, I opted for table salt. The original blogger preferred people to use the medium coarse salt because it adds little pops of saltiness. I didn't mind not having that. Also, in true Jill form, I had some leftover white chocolate chips from a recipe I did a while back, so I dumped what I had left, which amounted to about 1/4 cup, in with the regular semi-sweet chocolate chips. 

The batter after I creamed the sugars and butter, then added the eggs and vanilla.

The batter after all the ingredients were added.

I'm not sure why, but I have very few pictures of the making of these cookies. That was it. The process was kind of boring, so maybe that's why.

Anyway, I made the batter in the morning, decided to refrigerate it for the afternoon, and actually make the cookies when Joe got home from work so he could have "fresh out of the oven" cookies. The recipe said that if I refrigerated the batter, I'd end up with really fat cookies. But I ended up with these:

Very thin cookies...

Don't get me wrong, they ended up being extremely delicious. They really lived up to their name. They were so great, in fact, that after I inhaled 3-4 of them, I made Joe bring them to his work and force them on his coworkers. Luckily, his coworkers were happy to take them off my hands!

Joe and the kids could not stop eating them either!!
I'm surprised they lasted long enough to take pictures of them!!

I gave Mitchell a cookie while the chocolate was all melty and he made a BIG mess!!

We all loved these cookies. They were sugary and chocolatey. They were nice and soft with chewy edges. The white chocolate really gave them an added layer of flavor. The only thing that wasn't awesome about these cookies was that they came out super flat, but that was probably my own error. I guess I'll just have to keep making these until I get it right. And once I get it right, I better continue to make them in order to ensure I don't forget what I did to make them perfect. I'm thinking I might have to make these at least once a week (-;

P.S. Since I won't be blogging on Christmas, Merry Christmas to all 2 of you that read this blog! I hope the holidays bring you much happiness!! Please drink responsibly and be safe on the roads, if you're traveling tomorrow! I'm sorry that I've not kept up on here as much as I would like and as soon as the Christmas trees and all the decorations are back in the basement, all the gifts are unpacked and put away, and we don't have 30 parties to attend per week, I promise I'll be back to my old posting schedule!!

Monday, December 22, 2014

My Christmas Trees!

I started putting up the family Christmas tree, on my own, around age 10. My parents had this fake 6ft tree that was made up of just a few pieces, so it was easy enough for a little kid like me to put together the tree, string up the lights, and get the ornaments on.

It didn't take long before I was a master tree putter-upper and I loved it! I'd get my radio out and put on my favorite Christmas music and take my time, thinking about the placement of every ornament and every piece of tinsel. I'm sure it didn't matter as far as looks were concerned, but I wanted to savor the decorating as long as possible.

Moving out of the family home and into my own home with Joe only amped up my love of Christmas and Christmas trees. There's no one here to stop me from going nuts (although Joe has tried!! Lol) and now I have as many as 6 different trees to display at Christmastime!

Here they are, in all their glory!!

The "Gingerbread" Themed Tree!
This is our little 4ft tree. I like to display it in the front window of the dining room. Because it's so small and doesn't take very many ornaments to complete, it's so easy to have random themes. This year, it has the few gingerbread ornaments that I've collected on it. It doesn't quite fill it up, but that doesn't bother me.

A close up of some of the ornaments.

I'm always on the look out for specialty ornaments for this one. I have a little collection of Rudolph, the abominable snow man, and Santa Claus from those old Claymation movies. That might be the theme next year.

Our 7.5ft "Family" styled tree.


This is the tree that Joe and I bought for our first Christmas together. It's not only a tall tree but it has a wide base that took up half the room in our apartment! We had to actually move furniture out of the room to get this tree up once upon a time. Lol.. I'm so glad we moved.

The cats, trying to help.

It didn't take long before the cats got comfortable underneath the tree and started eating all the tinsel and knocking the bottom row of ornaments off!!

The tree with all the presents underneath. It looks so much smaller now.

This is the first year that this tree is in our formal living room with the family ornaments and this is where it will stay from now on. Normally, Joe would have set up his train set underneath, but he has been working a lot this holiday season, so he hasn't found the time. This is also the tree that houses the Christmas presents, so the kids can't get into them, since they don't go in this room all that often.

The "Red" themed tree in the great room.

After Christmas last year, I found this 9ft, pre-lit, semi-thin Christmas tree for a steal. So obviously, I snatched it up. We have a HUGE window in our great room and I wanted a HUGE tree to display in it. I didn't do that this year because I didn't feel like moving the furniture to accommodate that idea. But I plan to do it next year.

Since this is the tree that's in our main living space, I like to have a coordinated theme. This year, I picked red with white lights. It was pretty easy to find plain red ornaments and cheap enough to fill in the space with red bows. I am so ecstatic about how it turned out. I just really hope Mitchell doesn't knock it over!!!

 
Quinn and her "Baby Tree."


I wanted to set the red themed tree up by myself. Almost all of the ornaments were new and needed to be hung on those little hook things. So, in order to get Quinn to leave me alone, I gave her this mini tree that I had hanging around. She loved it. It now sleeps in her bedroom!

The little 1.5ft tree in the kitchen.

I found this little guy at my local thrift store. It cost $1.25. It's so cute and tiny. I have it propped on top of the microwave in the kitchen. Now that we have this one, there is a Christmas tree in every room of the house on the first floor. You might think, "That's too much." But it's not overwhelming at all since each one of the trees are different sizes.

As you can tell, I love Christmas and especially Christmas trees. I have another tree, a 6ft-er, that I didn't get the chance to put up. I'd planned to put it together on the second floor landing, but between everything else we have going on, there was no time. I hope I can do it next year.

I hope everyone has a great holiday season! Please be safe. Drink responsibly. Smile often!!!

Thursday, December 18, 2014

Christmas Card Photos!

Every year, Joe and I send out photo Christmas cards. I like to put pictures of us, the kids, and the cats on them. Ya know, our "family."

When we first started doing this, it was easy. It was just Joe and I, so we'd grab the cats, hit the timer on the camera, snap a few pictures, and we'd be done. My biggest worry in the past was that I looked fat. Nowadays, with kids that don't want to sit still or pay attention, it takes 154 times longer, and there's no way the kids AND cats will sit still for pictures. My biggest fear is that we won't get a good shot at all.

I tell Joe every year after we've spent time taking pictures and becoming very frustrated, that "next year, we'll hire someone to do this for us." That might save some frustration.

But every year, I forget the hassle of the past and become overconfident that this year will be the year the kids do a great job. And this year, we had a great time taking pictures. Having Joe around to help meant all the difference. I got some great shots of the kids because of him.

First, we visited Santa:


Quinn was in kid heaven getting to see Santa!

Last year, the Santa picture made it onto the Christmas card. I thought we might do the same thing this year, if we were desperate. The Mall Santa costs like $25 and in years past, I've gladly shelled out the dough to get Santa pictures. This year, I was made aware of free pictures with Santa at Wal-mart. I jumped at the chance. You can't beat free. And he wasn't that cheesy!!!

When Quinn saw him, she started shaking with delight! It was the funniest thing. She was shaking and giggling and was dying to run over to him. She sat on him and when he asked her what she wanted for Christmas, she replied, very loudly, "My mom said I can have whatever I want!!"  Hahah, No, I didn't. I said, "You can tell Santa whatever you want." Not close at all, little girl.

Joe and I even got in on the action!

Then we went home, set up the tripod and ended up with this picture, the one that made it onto our card as our family shot:

Mitchell actually looks happy for some reason!!

We did have a couple of close calls:

Like this one.. I love Quinn's face!!!
And this one.. Quinn needs to reign in that smile.

The family shots aren't too hard to get. If Mitchell is being held and everyone is saying "cheese,"  he sometimes cooperates. But, I really wanted to send an additional picture of the kids together. That would be WAY more difficult. Luckily, I had Joe behind me pretending to tickle the kids, we got some really cute ones:

Mitchell really thought he was gonna be tickled to death.


This one almost made the card. They're not looking at the camera, but they're looking in the same direction!

This one is going to get framed!! Joe is a genius.

This one made the card.

I love these kids! They did a great job together. Quinn, the ham she is, also wanted a little solo photo session:

Hahah She looks scared!!

Joe's cousin gave us this dress for Quinn. It reminded me of dresses I wore in my youth, so I set Quinn up in a pose I used a lot in the 80's.

As for the picture taking this year, it wasn't too terrible. I really do think that it'll be way easier next year as Mitchell will be a full year older and probably able to talk and understand better. Watch me regret not hiring a professional again next year!! Hahaha


Monday, December 15, 2014

DIY: Puffy Sleeved Shirt Into Sleeveless Shirt...

I keep seeing women (in catalogs/online) wearing billowy blouses. I feel like this would be a great look for me on those days that I'm feeling a little fat or when I feel like wearing something a little nicer than a t-shirt, but not something overly dressy.

But, you know stores charge an arm and a leg for clothing that's super trendy and you know I'm a cheapskate. So, I kept my eyes peeled during my weekly thrift shopping mornings with my mom. I ended up finding this shirt:

Milla can never leave me alone, it seems!

Wait, I know what you're thinking! You're thinking, "Please don't change a thing about that shirt. It's perfect as is!" But I assure you, it's going to look a lot better after I'm through with it!

I don't have to tell you, but I got it off the $0.50 rack (shocker!!). I fell in love with the cute burgundy square pattern on it (which doesn't photograph well at all!!)

Here's a close up of the little squares.

But those sleeves!! And those shoulder pads!! No wonder someone got rid of this shirt!!

In case you didn't notice the shoulder pads in my first before shot...

As you may already know, my sewing machine was threaded with black thread. The longest part of this refashion was changing the thread over to white thread!!

I need to get better at switching thread so I don't waste this much thread every time!!

Anyway, back to the refashion. The first things to go were the shoulder pads:

Look at those monsters!!

Don't worry, Mom, I saved them for you. I know you love big, honking shoulder pads.

Then I cut off the offending sleeves:

Them are some huge sleeves, Yo!

Then I folded over the raw edge and pinned it:

Yay!! It looks better already!

I wasn't too worried about folding it over a few times because I was too lazy.

I didn't know they even made clothing out of 100% polyester.

Yeah, this shirt is probably from the 1970's. I probably just cut up a highly sought after vintage shirt. Oh well, no going back now!!

It's a post about sewing. Here's the obligatory sewing shot.

I just want to reiterate, I hate changing the thread over from color to color. There has been so many strides in technology and improving crap that doesn't matter or actually affect anyone. Yet, replacing a bobbin in a sewing machine takes a college education and 20 years experience. My mom has a sewing machine from the 1980's. It's the same terrible threading situation as the one I just got 6 months ago. Why is this technology not updated? I don't get it.

Enough complaining. How can I complain when I look this good?!

I'm so gorgeous, even the snowman wants to touch my butt!!

Ok, enough about how good I look, I need to complain again. Lol. Why is it that when I get ready to go out (grocery shopping, family parties, etc), I can't find anything in my closet that looks nice and goes together. But when I randomly grab items, on a lark, out of my closet, I end with a fabulous outfit?! I need to put outfits together like this in my real life! I love it all together.

Looks pretty good without the coat, too, if I do say so myself!


I wish the pattern photographed better because those little squares are the exact color of my shoes. It's like they were made for each other.

So, I know most of my refashions aren't super exciting or even that hard to do, but I do get a lot of joy in taking something that's ill-fitting or semi-hideous and changing it into something that looks better or, dare I say, awesome (-; I also get enjoyment in that maybe it might inspire you to change up some of your clothing.

 Even if I only inspire you to donate your stuff to thrift stores so that people like me can get use out of your old things that you no longer wear, it's worth it for me to keep on going.

I probably should've used a coat free pic, but I love it with the coat.


Friday, December 12, 2014

Joe Can Cook: Cookie Butter & Banana Smoothie

The kids love fruit. Just for a change of pace, we decided to make them some smoothies after dinner the other night. It was a great little treat and one that they REALLY loved! I gave Joe the instructions on what to put in the smoothies and he did all the work! Hahaha


Cookie Butter & Banana Smoothie


Ingredients:
Joe didn't do much measuring, so, I'm guessing here:
2 bananas
1 cup of yogurt
1/4 cup cookie butter/peanut butter
3/4 cup of oats (or granola cereal)
Add ice to get the consistency you'd like.

Directions:
Add all ingredients in blender. Blend until smooth. Pour into cups and serve.
Makes 2-3 small servings.


They came out great, although, they were a little too thick for our cheap dollar store straws. We resorted to using baby spoons.

Quinn tried and tried, but couldn't make that straw work!

Mitchell absolutely loves bananas. He begs for them every morning. I knew he'd love this smoothie.

Quinn wouldn't relinquish her spoon to me so I could taste it. She fed me instead!

She gave me like 5 bites, then completely gave up on sharing.

Joe made these with some granola based cereal that we had on hand that could possibly become stale soon. Better to use it up than throw it away. But because it was more granola than plain old oats, or even quick oats, it didn't get smashed up in the blender very easily, so the smoothie was pretty chunky. It was still pretty good. I don't think the kids would've complained about it at all, but next time, I'm going to tell Joe to use the regular oats and probably more milk/less yogurt.

I see a lot more smoothies in our future though!!!


Wednesday, December 10, 2014

Finished Product: Salt Dough Ornaments!

The older Quinn gets, the more she wants to do her own little projects and try to help me when I do mine. She's at an age where she really does a decent job with not too much direction.

I've been searching around for Christmas projects that she could do that don't require cutting, sewing, or too many steps from me to get to a finished product. She could sit for hours coloring or painting, so I figured that might be a good place to start. When I came across these Salt Dough Ornaments I knew I found what I was looking for.

Granted, I'd have some initial work to do, but once that was out of the way, I could easily just set her up with some paintbrushes and let her go to town, so to speak. Here's how it went:

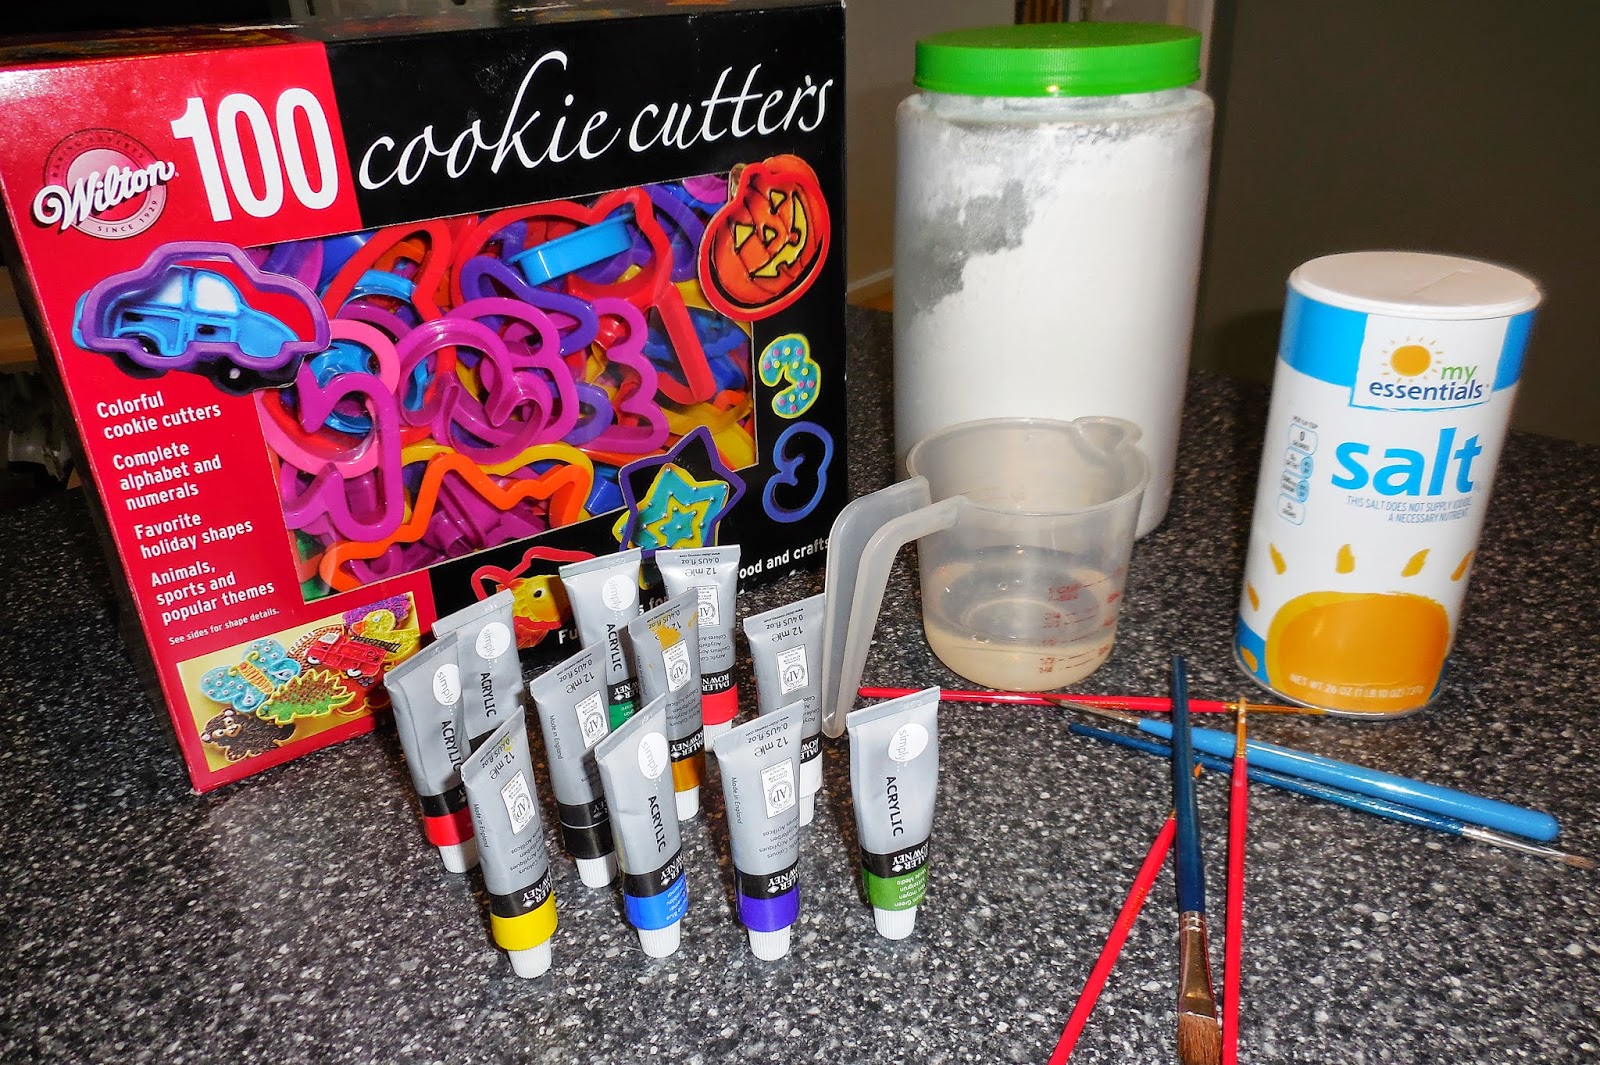
Salt Dough Ornaments

It looks like there's more involved than there really is.

Ingredients:
1 cup flour
1/2 cup salt
1/2 cup lukewarm water

Directions:
  1. Mix salt and flour in mixing bowl
  2. Add water
  3. Knead with your hands until it forms into a dough-like consistency. If too dry, add a little water. If too sticky, add a little flour.
  4. Roll your dough into an even, flat disc on work surface/wax paper. Use flour to keep dough from sticking.
  5. Do not roll too thin, especially if you'll be  making handprints as the hand printing will thin dough in areas.
  6. Use cookie cutters to cut into shapes. Make sure to make a hole at the top of each piece so you can hang them!
  7. Let air dry for 4 days! On the 2nd day, flip the ornaments over so the underside dries as well.
  8. Then paint however you like. Check out the original website for some cute ideas and additional ways to preserve your ornaments!


I picked out some shapes that I thought Quinn would enjoy painting: A star, Christmas tree, snowman, and scalloped circle.

This small amount of dough ended up making quite a few ornaments. But I still wanted more so I made another half batch.

Quinn helped flatten the second batch.

I had Quinn make thumbprints on the big circle ones.

I wanted Mitchell's thumbprints, too, but he kept trying to pick them up or step on them.

I ended up with 14 ornaments.

Quinn had really hoped to help more than just the 30 seconds it took for her to make a few thumbprints. And both kids thought these were cookies and kept asking to eat them! Poor kids. And now we wait...

And wait...

And wait... Geez, this is taking forever! I should've picked the kind you cook in the oven so I didn't have to wait...

And... We're BACK!!!!

Next time I want to make these, please remind me that the whole process involves a lot of waiting!! After I waited the 4 excruciatingly long days for these to dry, I had to wait an hour or so in between every layer of paint. The waiting also proved to me that Quinn gets her lack of patience from me. I heard from her several times per day that she wanted to paint some more. Hahaha... I knew she'd love painting.

In the interest of saving space, I made a few photo collages of us working on these ornaments:


I gave her the stars and some yellow paint, then left her to her own devices for about 15 minutes until she yelled out to me, "Mama!! I'm done with the stars!!"

Then I gave her the Christmas trees and some green paint. 15 minutes later, I heard, "Mama!! I love painting! Can I paint some more!?"

Finally, I gave her the snowmen and the scalloped circles and a lot of white paint and sat my butt on the couch and cuddled with Mitchell while he watched "Frozen." Quinn wasn't even jealous that she was missing out on her "build a snowman movie."

We ended up having to shelve this craft for a couple of days due to our busy schedule. But don't think Quinn gave up on it so easily. She still asked me 100 times a day if she could paint.

Finally, it was time to paint again!!

Painting party, take 2!

I painted a couple of black lines on the trees and let her make little "light bulbs" on them. She liked getting to switch colors every couple of minutes!

I didn't know what to do with the stars, so I told her she could make smiley faces on them.

When it came to the snowmen, she needed the least amount of direction. The minute she saw them, she asked, "You want me to put buttons on them?" Side note: She can't say "button." Instead, she says, "Bunt." It's so cute. I correct her but I don't think she thinks she's saying it wrong.

Lefty? Righty? He can't decide!!! Although he seems like a lefty to me.


At this point, Quinn and I had been ignoring Mitchell for a while and he was getting quite bored, so I scooped him up and let him paint a star. He actually did pretty well for a 1 and 3/4 year old! I was pretty impressed.

Sibling love!!
Always the big sister, Quinn supervised Mitchell the entire time he held the paint brush. She was certain he was painting a pirate. P.S. His looks nothing like a pirate, just random squiggly lines.

Shameless (and least flattering) selfie time!


When it came to painting the scalloped circles that had the kids thumbprints in them, I decided to do it myself. I turned the thumbprints into little Rudolph the red-nosed reindeer. I enjoyed painting my little part, too!

When they were all finished, it was time to string them up. I made little holes in the tops of them, but soon realized that my ribbon was too big to easily do the job. I had an idea. I grabbed my sewing kit...

I had to put this stuff on an envelope so you could see the needle.
I threaded a needle, then attached my ribbon to the end of the thread. This made it really easy to pull the ribbon through the tiny holes. I also threaded them all at once, then cut the ribbon for each one. I feel like this saved time.

Uh oh!!! What happened??!?!!?

Maybe it wasn't as easy as I thought. When I was stringing one of the stars, I dropped it from my hand onto the counter. It was like a 1ft drop. Not even. And that little guy just shattered. Quinn apologized profusely because I'd been reminding her not to drop them and break them. I think she thought she did it. She's so sweet. Luckily, it didn't take much convincing that her mother was the destructive force of this situation.

And here are the ones that I didn't ruin:

The 3 weird (and sad looking) snowmen.

The 3 trees that came out pretty good.

Quinn's "smiley face" stars on the ends and Mitchell's "Jackson Pollack" in the middle.

I made 4 of these. They all look the same. You get the idea.

I'm glad I was able to get the kids thumbprints in the ornaments. I mean, I don't have access to their actual thumbprint, more so just the size of their fingerprint, but maybe when they're older, they'll get a kick out of the fact that they had such small thums. And they have tangible proof of it!

I made these with the intention of giving them out to some family members along with their gifts on Christmas, but I don't know how I'll manage to part with any of them!! They're all so cute, even though they came out pretty crap-tacular (I guess I won't be starting a salt dough ornament business any time soon).

When Joe got home from work and saw our finished product, he looked at me, and said, pleadingly, "So, I hope this means we won't have to spend $20 on a family commemorative mall ornaments this year?!" Uhh.. Wrong, Joe!! You're not gonna get out of it THAT easily!! I love those expensive mall ornaments with our names on them (-;